Create an Adorable Handmade Gnome for Christmas!
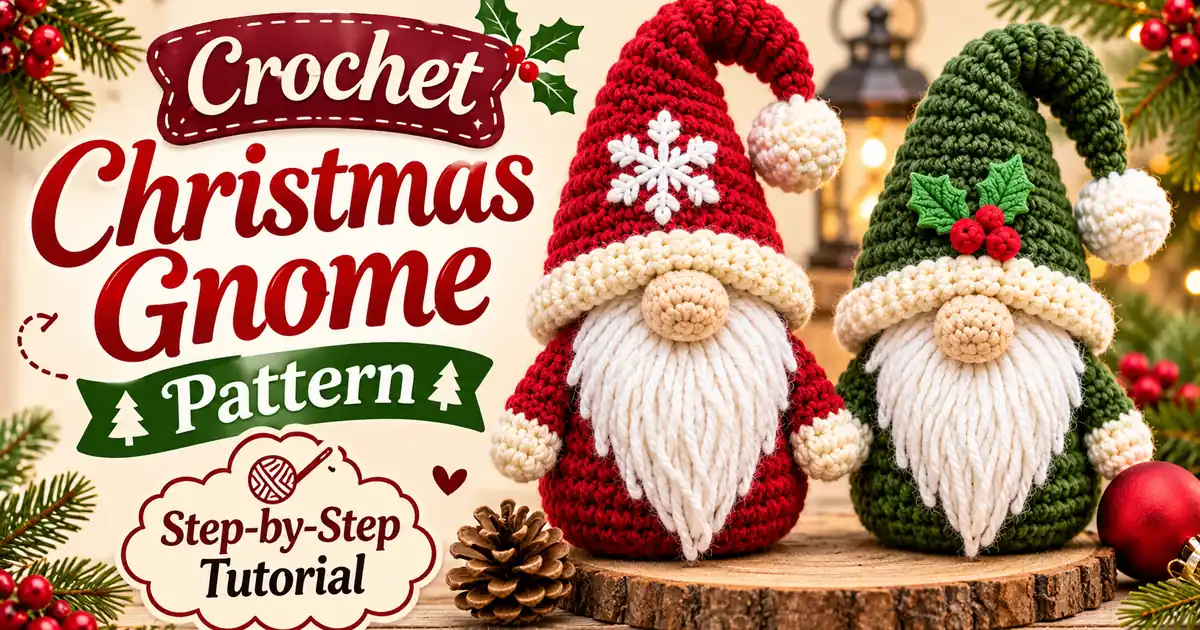
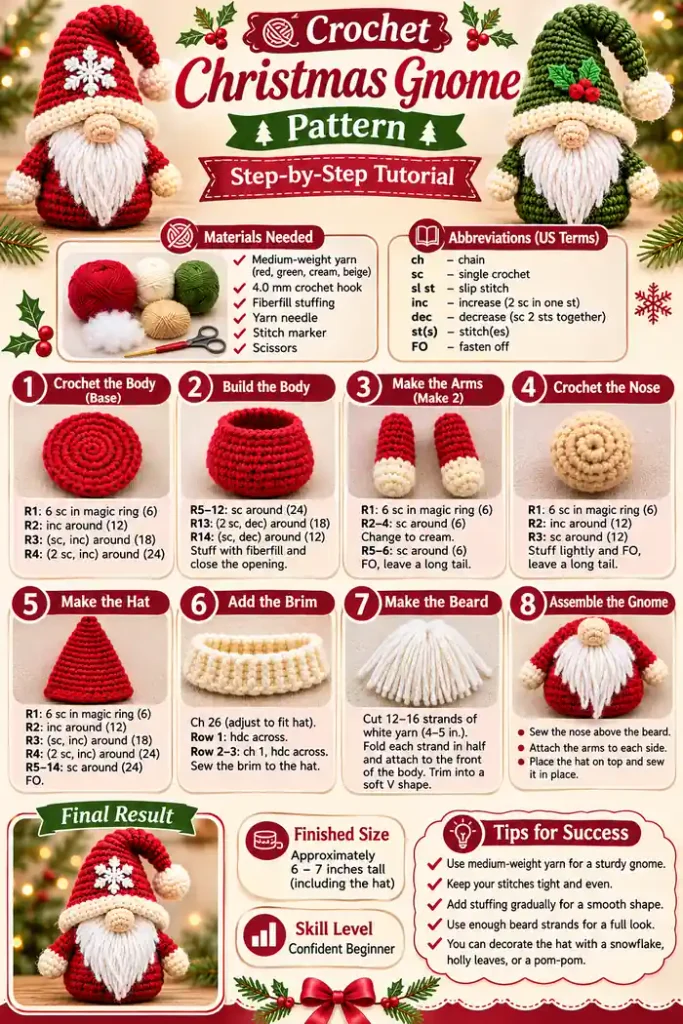
Add a little handmade magic to your holiday decorations with this Crochet Christmas Gnome Pattern. This charming gnome features a round body, a tall floppy hat, a soft yarn beard, and a cute little nose.
Choose traditional red and cream yarn, or try forest green, beige, and white for a different festive look. Your finished gnome will look lovely on a mantel, shelf, or Christmas table.
In this tutorial, you’ll learn how to crochet the body, hat, nose, and arms, create the beard, and assemble all the pieces into an adorable Christmas decoration.
Why You’ll Love This Crochet Christmas Gnome
Christmas gnomes are charming little decorations that bring a cozy handmade feeling to holiday homes. With their tall hats, round noses, and long beards, they make adorable additions to Christmas shelves, mantels, and festive displays.
This crochet Christmas gnome pattern combines simple amigurumi construction with decorative finishing details. You can make the body and hat in traditional Christmas colors, then add a soft beard and a small pom-pom to complete the look.
- Adorable Scandinavian-inspired Christmas design.
- Customizable hat colors and decorations.
- Separate body, nose, arms, and hat pieces.
- Soft yarn beard for a cozy appearance.
- Perfect for Christmas shelves and mantel displays.
- A thoughtful handmade holiday gift.
Materials Needed for a Crochet Christmas Gnome
Prepare your yarn and supplies before beginning. Medium-weight yarn is a good choice because it creates a sturdy body and helps the gnome stand properly when stuffed.
- Medium-weight red yarn for the body and hat.
- Cream or white yarn for the beard and hat brim.
- Beige yarn for the nose.
- Small amount of matching yarn for the arms.
- 4.0 mm crochet hook.
- Polyester fiberfill stuffing.
- Yarn needle.
- Stitch marker.
- Scissors.
- Optional yarn pom-pom or decorative snowflake.
Choosing the Best Yarn
Medium-weight acrylic yarn is a practical option for this project. It comes in many festive colors and creates a soft fabric that is easy to shape.
Yarn for the Body
Choose red, forest green, beige, or cream yarn. A darker shade gives the gnome a traditional Christmas appearance.
Yarn for the Beard
White or cream yarn creates a lovely fluffy beard. Smooth yarn can be cut into strands, while soft textured yarn gives a fuller appearance.
Yarn for the Hat
Use the same yarn as the body or choose a contrasting shade. Red, green, and burgundy are beautiful holiday colors.
Finished Size and Gauge
The sample gnome is designed to measure approximately 6–7 inches tall, including the hat. The exact size depends on your yarn, hook, stuffing, and finishing choices.
| Detail | Approximate size |
|---|---|
| Finished height | 6–7 inches |
| Body height | 3–3.5 inches |
| Body width | 3–4 inches |
| Hat height | 3–4 inches |
| Yarn weight | Medium-weight |
| Hook size | 4.0 mm |
| Skill level | Confident beginner |
Gauge is not critical for this decorative project, but consistent stitches help the gnome keep its shape. Work firmly enough that the stuffing does not show through the fabric.
Crochet Abbreviations (US Terms)
| Abbreviation | Meaning |
|---|---|
| ch | Chain |
| sc | Single crochet |
| sl st | Slip stitch |
| inc | Increase (2 sc in one stitch) |
| dec | Decrease (sc 2 stitches together) |
| st | Stitch |
| sts | Stitches |
| FO | Fasten off |
How the Crochet Christmas Gnome Is Made
The gnome is made from several separate pieces. First, crochet and stuff the body. Then make the nose, arms, and pointed hat. The beard is added to the front of the body before the hat is attached.
- Crochet the rounded body.
- Stuff and close the body.
- Make the nose.
- Crochet two small arms.
- Make the pointed hat.
- Add a contrasting hat brim.
- Attach the beard strands.
- Assemble all the pieces.
- Add optional festive decorations.
Step-by-Step Crochet Christmas Gnome Pattern
Part 1: Crochet the Gnome Body
- Using your main body color, make a magic ring.
- Work 6 single crochet stitches into the ring.
- Pull the ring closed.
- Place a stitch marker in the first stitch.
- Round 2: Work 2 sc into each stitch (12 sts).
- Round 3: Repeat (1 sc, inc) around (18 sts).
- Round 4: Repeat (2 sc, inc) around (24 sts).
- Keep the stitches even as the base becomes wider.
- Rounds 5–12: Work 1 sc into each stitch around (24 sts).
- Move the stitch marker after every round.
- Keep the body fabric firm and even.
- Begin adding small amounts of stuffing as the body grows.
- Round 13: Repeat (2 sc, dec) around (18 sts).
- Round 14: Repeat (1 sc, dec) around (12 sts).
- Add more stuffing before the opening becomes too small.
- Continue decreasing until the opening is closed.
- Fasten off and weave in the yarn end.
R1: 6 sc in magic ring (6).
R2: Inc around (12).
R3: (Sc, inc) around (18).
R4: (2 sc, inc) around (24).
R5–12: Sc around (24).
R13: (2 sc, dec) around (18).
R14: (Sc, dec) around (12).
Stuff firmly, continue closing, and fasten off.
Part 2: Make the Gnome Nose
- Using beige yarn, make a magic ring.
- Round 1: Work 6 sc into the ring (6).
- Round 2: Inc in every stitch (12).
- Round 3: Sc in each stitch around (12).
- Add a small amount of stuffing.
- Fasten off, leaving a long sewing tail.
The nose should be round and slightly raised. Avoid adding too much stuffing, as this can make it look oversized.
Part 3: Crochet the Arms
- With your sleeve color, make a magic ring.
- Round 1: Work 6 sc into the ring (6).
- Rounds 2–4: Work 1 sc into each stitch (6).
- Change to cream yarn for the small hand section.
- Rounds 5–6: Work 1 sc into each stitch (6).
- Fasten off, leaving a long sewing tail.
- Repeat the same instructions for the second arm.
- Keep both arms similar in length.
- Add a tiny amount of stuffing if desired.
- Leave long tails for sewing.
Part 4: Crochet the Pointed Hat
The tall pointed hat is one of the most recognizable features of a Christmas gnome. It can be made in red, green, burgundy, or any festive shade.
- With your chosen hat color, make a magic ring.
- Round 1: Work 6 sc into the ring (6).
- Round 2: Inc in every stitch (12).
- Round 3: Repeat (sc, inc) around (18).
- Round 4: Repeat (2 sc, inc) around (24).
- Rounds 5–14: Work 1 sc into each stitch around (24).
- Continue evenly until the hat reaches your preferred height.
- For a longer pointed hat, add extra even rounds.
- Fasten off and leave a long tail for sewing.
Part 5: Add the Contrasting Hat Brim
- Using cream yarn, chain approximately 26 stitches, adjusting to fit the hat opening.
- Work 1 half double crochet into the second chain from the hook and across.
- Chain 1 and turn.
- Work 1 half double crochet into each stitch across.
- Repeat for 2–3 rows, checking the length around the hat.
- Fasten off, leaving a sewing tail.
- Wrap the cream strip around the lower edge of the hat.
- Check that the ends meet neatly.
- Sew the short ends together.
- Attach the brim to the hat with small stitches.
- Weave in the yarn ends.
Part 6: Create the Gnome Beard
The beard gives the gnome its adorable character. You can use white or cream yarn strands to create a soft layered beard.
- Cut 12–16 strands of white or cream yarn.
- Make each strand approximately 4–5 inches long.
- Fold each strand in half.
- Keep the strands together in a small bundle.
- Position the beard bundle on the front of the body.
- Place the folded center of each strand against a suitable stitch.
- Use a crochet hook or yarn needle to pull the folded loop through.
- Pass the loose ends through the loop and pull gently to secure.
- Arrange the strands into a neat beard shape.
- Trim the ends into a soft V shape if desired.
Part 7: Assemble the Christmas Gnome
- Position the nose near the upper center of the beard.
- Use stitch markers to hold it in place.
- Sew it securely to the body.
- Make sure the beard sits underneath the nose.
- Place one arm on each side of the body.
- Keep both arms at a similar height.
- Sew the upper ends securely to the body.
- Hide the yarn tails inside the crochet fabric.
- Place the hat over the top of the body.
- Position the brim just above the nose.
- Make sure the beard remains visible underneath.
- Sew the hat securely around the opening.
- Adjust the tip to create a gentle bend.
Part 8: Add Festive Finishing Details
- Add a small cream pom-pom to the hat tip.
- Attach a crochet snowflake to the front.
- Use tiny holly leaves and berries for a festive look.
- Keep all decorations securely attached.
- Check all seams and attachments.
- Adjust the hat and beard.
- Trim any uneven yarn strands.
- Make sure the gnome sits upright.
- Weave in all remaining yarn ends.
Beautiful Color Ideas for Crochet Christmas Gnomes
You can make several gnomes in different color combinations to create a charming Christmas display.
1. Traditional Red and Cream
Use a red body and hat with a cream brim and beard. Add a white snowflake to the hat for a classic festive design.
2. Forest Green and Ivory
Choose forest green for the body and hat, with an ivory beard and brim. Add small red berries for a traditional Christmas accent.
3. Burgundy and Beige
Deep burgundy with warm beige creates an elegant handmade decoration that looks lovely with neutral holiday decor.
4. White and Soft Gray
Use white for the body and a soft gray hat for a snowy winter-inspired gnome.
Creative Ways to Decorate Your Gnome
Once the basic gnome is finished, add small details to make it unique.
- Snowflake applique: Attach a small white snowflake to the hat.
- Holly leaves: Add green leaves and tiny red berries.
- Pom-pom: Make a soft pom-pom for the hat tip.
- Striped hat: Change colors every few rounds.
- Textured beard: Use fluffy yarn for a fuller beard.
- Matching family: Make several gnomes in different sizes.
Common Crochet Christmas Gnome Mistakes
1. The Body Does Not Stand Properly
Use firm, even stitches and distribute the stuffing evenly. Make sure the bottom is flat before closing the body.
2. The Body Looks Uneven
Check your stitch counts at the end of every increase and decrease round. Use a stitch marker to keep track of the beginning of each round.
3. The Hat Is Too Loose
Check the opening against the body before sewing. Adjust the final rounds or use a smaller hook if the hat is too wide.
4. The Beard Looks Too Thick
Start with fewer yarn strands and add more gradually. Trim the beard evenly so it does not hide the nose.
5. The Nose Is Not Centered
Use stitch markers to test the position before sewing. Check the front view before securing the nose permanently.
6. The Gnome Looks Unbalanced
Make sure the arms are attached at equal heights and the hat is positioned centrally. Adjust the stuffing if the gnome leans to one side.
How to Care for Your Crochet Christmas Gnome
With gentle care, your handmade gnome can become part of your Christmas decorations for many years.
- Remove dust with a soft brush.
- Avoid pulling the beard strands.
- Keep the gnome away from moisture.
- Check decorative pieces before storing.
- Store in a clean, dry box.
- Avoid placing heavy objects on top of the hat.
Frequently Asked Questions
Is this crochet Christmas gnome pattern suitable for beginners?
This project is best for confident beginners who understand single crochet, increases, decreases, working in rounds, and basic sewing. The beard and assembly require a little extra patience.
What yarn is best for a crochet Christmas gnome?
Medium-weight acrylic yarn is a practical choice. Use white or cream yarn for the beard and a contrasting shade for the hat.
What crochet hook size should I use?
A 4.0 mm hook is a useful starting point for medium-weight yarn. Adjust the size to create firm stitches that do not reveal the stuffing.
How do I make the gnome beard?
Cut several yarn strands, fold them in half, and attach them to the front of the body using a loop attachment method. Trim the ends to create the beard shape.
Can I make a gnome without a beard?
Yes. You can leave off the beard and use a small scarf, collar, or decorative front detail instead.
How can I make the hat floppy?
Make the hat tall enough to bend gently, then secure the curved tip with a few hidden stitches if needed.
Can I make a larger Christmas gnome?
Yes. Use thicker yarn and a larger hook, or increase the body and hat stitch counts while keeping their proportions balanced.
Can I use this gnome as a Christmas gift?
Absolutely. Handmade gnomes make lovely gifts for friends, family members, teachers, and anyone who enjoys festive decorations.
Can I sell finished crochet Christmas gnomes?
You can sell finished handmade items subject to any terms that apply to the pattern you follow. If you use another designer’s instructions, check their usage guidelines.
Conclusion
This crochet Christmas gnome pattern is a charming way to add handmade personality to your holiday decorations. With its round body, tall hat, little nose, and soft beard, the finished gnome makes a lovely seasonal display.
Try classic red and cream, forest green and ivory, or burgundy and beige. You can also make a matching set in different sizes and colors for your mantel or Christmas table.
Gather your favorite yarn and crochet hook, follow the steps, and enjoy creating your own adorable Christmas gnome!