Make Your Own Cute Mini Christmas Tree Ornament!
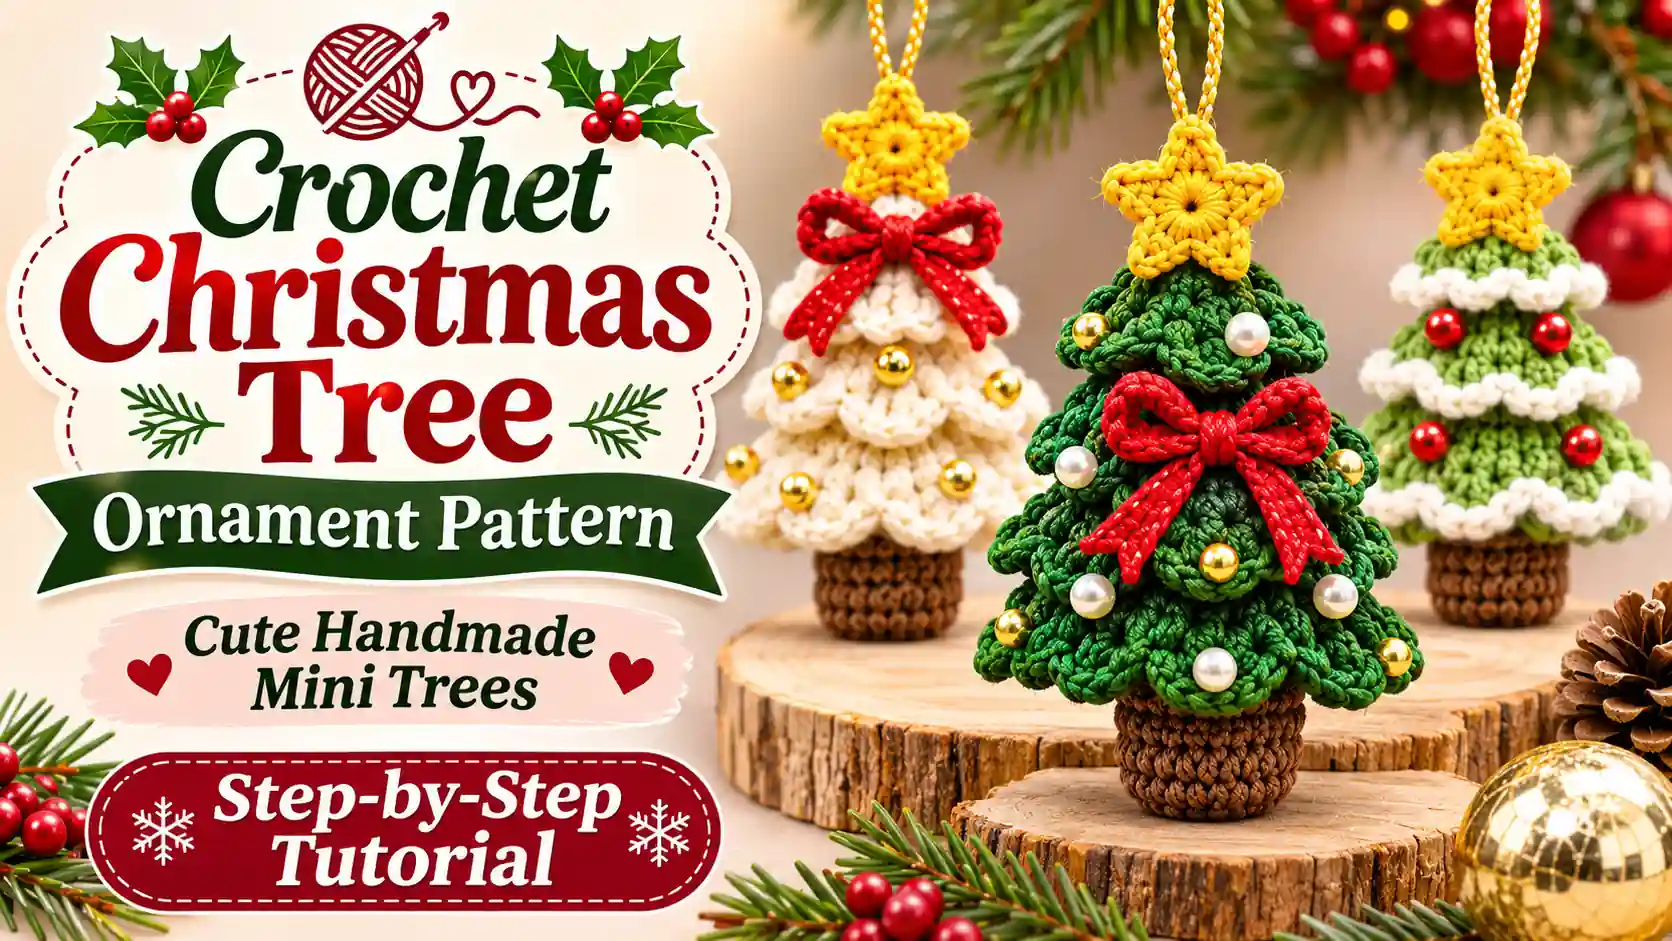
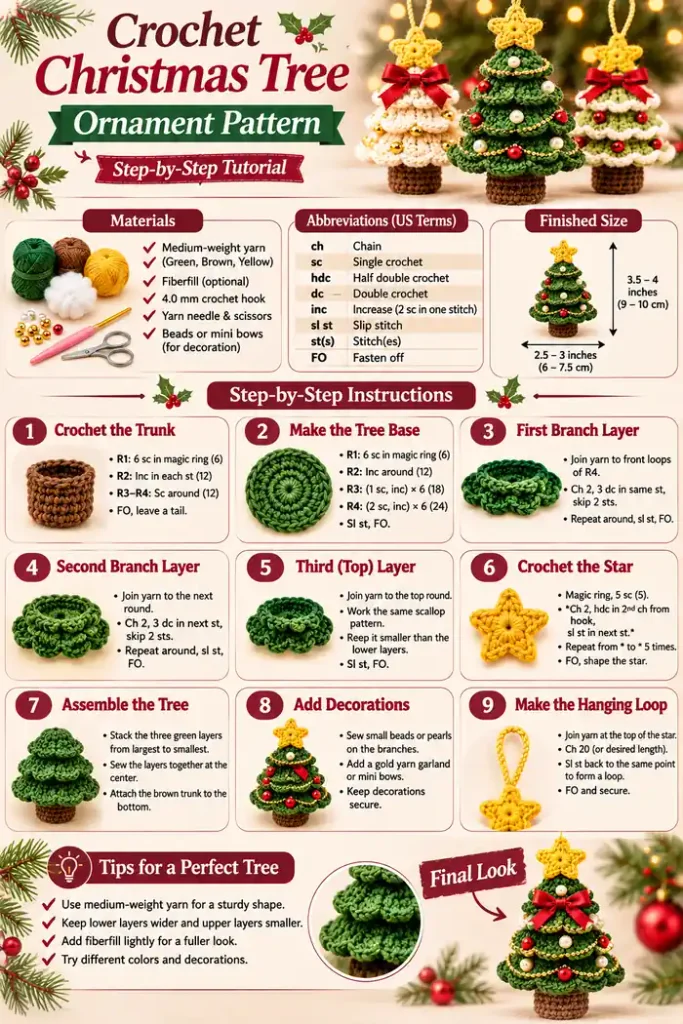
Add a handmade touch to your holiday decorations with this Crochet Christmas Tree Ornament Pattern. These adorable mini trees feature layered green branches, a little brown trunk, and a bright star on top.
Hang your finished crochet Christmas tree on your holiday tree, decorate a garland, or make a set of mini ornaments for thoughtful handmade gifts. You can customize each one with tiny bows, beads, or festive yarn colors.
In this tutorial, you’ll learn how to crochet the tree base, create the layered branches, make the star, and add the finishing details and hanging loop.
Why You’ll Love This Crochet Christmas Tree Ornament
Handmade Christmas decorations bring a special warmth to the holiday season. These little crochet Christmas trees are charming, colorful, and enjoyable to make. Their layered branches give them a lovely tree shape, while the tiny trunk and star complete the festive look.
This crochet Christmas tree ornament pattern is also a wonderful way to use leftover yarn. You can make several trees in different shades of green, decorate them with little beads, and create a beautiful matching set for your Christmas tree.
- Small and lightweight Christmas decorations.
- Layered branches create a beautiful tree shape.
- Customizable colors and festive decorations.
- Uses small amounts of leftover yarn.
- Perfect for Christmas trees, garlands, and gift wrapping.
- A lovely handmade gift for friends and family.
Materials Needed for a Crochet Christmas Tree
Gather your supplies before starting. You only need a few yarn colors and basic crochet tools to make this little Christmas decoration.
- Medium-weight green yarn for the tree.
- Brown yarn for the trunk.
- Yellow or gold yarn for the star.
- Cream or white yarn for optional trim.
- 4.0 mm crochet hook.
- Yarn needle.
- Scissors.
- Stitch marker.
- Small amount of fiberfill, optional.
- Small beads, buttons, or mini bows for decoration.
- Matching yarn or ribbon for the hanging loop.
Choosing the Best Yarn
Medium-weight acrylic or cotton yarn works well for this project. Choose yarn that gives your stitches a clear shape and makes the little branches easy to see.
Green Yarn for the Tree
Forest green, Christmas green, and sage green are lovely choices. You can use one shade throughout or combine two greens for a layered appearance.
Brown Yarn for the Trunk
Choose medium or dark brown yarn for the bottom of the tree. This gives the ornament a natural tree-like finish.
Yellow Yarn for the Star
Golden yellow yarn creates a bright star that stands out against the green branches. You can also use metallic gold yarn for a festive touch.
Finished Size and Gauge
The finished ornament is approximately 3.5–4 inches tall, excluding the hanging loop. Your final size will depend on your yarn, hook, stitch tension, and number of tree layers.
| Detail | Approximate measurement |
|---|---|
| Finished height | 3.5–4 inches |
| Tree width | 2.5–3 inches |
| Trunk height | 0.75 inch |
| Yarn weight | Medium-weight |
| Hook size | 4.0 mm |
| Skill level | Confident beginner |
| Construction | Separate trunk, layered tree, star, and loop |
Gauge is not critical for this decorative project. However, keep your stitches even so the tree layers look neat and hold their shape.
Crochet Abbreviations (US Terms)
| Abbreviation | Meaning |
|---|---|
| ch | Chain |
| sc | Single crochet |
| hdc | Half double crochet |
| dc | Double crochet |
| inc | Increase (2 stitches in one stitch) |
| sl st | Slip stitch |
| st | Stitch |
| sts | Stitches |
| FO | Fasten off |
How to Crochet a Christmas Tree Ornament
The ornament is made from a small brown trunk, several green layers, and a yellow star. Each tree layer is crocheted separately and then stacked to create the familiar Christmas tree shape.
- Crochet the brown trunk.
- Make the circular green tree base.
- Work the first scalloped branch layer.
- Add the second and third layers.
- Crochet the yellow star.
- Assemble the trunk and tree layers.
- Decorate with beads, bows, or yarn trim.
- Attach the hanging loop.
Step-by-Step Crochet Christmas Tree Pattern
Part 1: Crochet the Brown Tree Trunk
- Take your brown yarn and crochet hook.
- Make a magic ring.
- Work 6 single crochet stitches into the ring.
- Pull the ring closed.
- Place a stitch marker in the first stitch.
- Round 2: Work 2 single crochet stitches into each stitch (12 sts).
- Round 3: Work 1 single crochet into each stitch around (12 sts).
- Round 4: Work 1 single crochet into each stitch around (12 sts).
- Fasten off, leaving a long sewing tail.
R1: 6 sc in magic ring (6).
R2: Inc around (12).
R3–R4: Sc around (12).
FO, leaving a long tail for sewing.
Part 2: Make the Green Tree Base
The green base forms the top foundation for the layered branches. Use forest green yarn for a traditional Christmas tree look.
- Make a magic ring with green yarn.
- Round 1: Work 6 single crochet stitches into the ring (6).
- Round 2: Work 2 single crochet stitches into every stitch (12).
- Round 3: Repeat (1 sc, inc) around (18).
- Round 4: Repeat (2 sc, inc) around (24).
- Join with a slip stitch and fasten off if making the base separately.
R1: 6 sc in magic ring (6).
R2: Inc around (12).
R3: (Sc, inc) around (18).
R4: (2 sc, inc) around (24).
Part 3: Crochet the First Branch Layer
The scalloped edges create the layered appearance of the tree. Work this decorative round into the front loops of the base stitches.
- Join green yarn to a front loop of the tree base.
- Chain 2.
- Work 2 double crochet stitches into the same stitch.
- Skip the next 2 stitches.
- Work 3 double crochet stitches into the next stitch.
- Skip the next 2 stitches.
- Repeat around the base.
- Join with a slip stitch.
- Fasten off or continue with the next layer as designed.
This creates a scalloped branch edge. If the scallops do not divide evenly around your stitch count, adjust the skipped stitches slightly and distribute the groups evenly.
Part 4: Add the Second Branch Layer
- Join green yarn to the next available front-loop round above the first layer.
- Chain 2.
- Work 3 double crochet stitches into the next selected stitch.
- Skip 2 stitches.
- Repeat the scallop sequence around.
- Join with a slip stitch.
- Fasten off and weave in the end.
Part 5: Make the Top Branch Layer
- Join green yarn to the next available round above the second layer.
- Work the same scallop sequence around.
- Keep the top layer slightly smaller than the lower layers.
- Fasten off and weave in the yarn end.
Part 6: Crochet the Yellow Star
A little star makes the ornament instantly recognizable. Use yellow or gold yarn for a bright finish.
- Make a magic ring with yellow yarn.
- Work 5 single crochet stitches into the ring.
- Pull the ring closed.
- Join with a slip stitch.
- Chain 2.
- Work 1 half double crochet into the second chain from the hook.
- Slip stitch into the next stitch of the center ring.
- Repeat the same point sequence four more times.
- Join neatly and fasten off.
Shape the five points gently with your fingers. If you prefer a more defined star, make two matching stars and sew them together around the edges.
Part 7: Assemble the Tree
- Place the brown trunk underneath the green tree base.
- Center the trunk carefully.
- Sew the trunk securely to the bottom of the tree.
- Stack the branch layers from largest to smallest.
- Overlap the upper edges slightly.
- Sew the layers together at the center.
- Position the yellow star at the top of the tree.
- Use the yarn tail to sew it securely.
- Check that the star sits straight.
- Weave in the remaining yarn end.
Part 8: Add Christmas Decorations
- Sew small beads onto the branches as ornaments.
- Add tiny red bows between the layers.
- Use cream yarn to create a snowy trim.
- Add a thin gold yarn strand as a garland.
- Keep all decorations securely attached.
Part 9: Make the Hanging Loop
- Join matching yarn at the top or back of the star.
- Chain approximately 20 stitches.
- Slip stitch back into the starting point to form a loop.
- Fasten off and secure the yarn.
- Reinforce the attachment with a few extra stitches.
Beautiful Color Ideas for Crochet Christmas Trees
You can make a whole collection of mini trees in different colors. Here are a few festive combinations.
1. Traditional Green and Red
Use forest green for the branches, brown for the trunk, and yellow for the star. Add red bows and little gold beads for a classic Christmas look.
2. White and Cream Snowy Tree
Use ivory yarn for the branches and cream yarn for the trunk. Add tiny silver or pearl-style beads to create a soft winter decoration.
3. Sage Green and Gold
Choose sage green for the tree and golden yellow for the star. Add gold yarn trim for an elegant handmade ornament.
4. Red and White Candy Cane Tree
Alternate red and white branch layers for a cheerful candy-cane-inspired Christmas decoration.
5. Dark Green and Burgundy
Use deep green branches with burgundy bows and a golden star. This combination looks rich and traditional.
Creative Ways to Use Crochet Christmas Tree Ornaments
These mini trees are useful for more than decorating your Christmas tree. Try some of these ideas:
- Christmas tree ornaments: Hang them from the branches using the crochet loop.
- Garland decorations: Attach several mini trees to a long decorative cord.
- Gift toppers: Sew a small loop onto a gift ribbon.
- Table decorations: Place several trees together as a festive centerpiece.
- Handmade gifts: Make a matching set in different shades of green.
- Advent decorations: Use mini trees as part of a handmade holiday display.
Common Crochet Christmas Tree Mistakes
1. The Tree Layers Look Uneven
Check your stitch counts and distribute the scallops evenly. If the layers look too crowded, use fewer stitches in each group or adjust the skipped stitches.
2. The Tree Does Not Look Triangular
Make the bottom layer wider than the upper layers. Each layer should become gradually smaller toward the top.
3. The Branches Curl Too Much
Your tension may be too tight. Relax your stitches or try a slightly larger hook. Shape the layers gently before assembly.
4. The Star Looks Uneven
Keep the five points similar in size. Count each repeated point sequence carefully and shape the star before attaching it.
5. The Trunk Is Too Large
Check the trunk against the bottom of the tree before sewing. It should be visible without overpowering the green branches.
6. The Ornament Does Not Hang Straight
Attach the hanging loop at the center of the star or top of the tree. Reinforce it with several stitches.
How to Care for Your Crochet Christmas Tree Ornament
Store your handmade ornaments carefully so you can enjoy them for many Christmas seasons.
- Remove dust gently with a soft brush.
- Avoid pulling on the star or hanging loop.
- Keep small beads and decorations securely attached.
- Store the ornaments in a dry container.
- Wrap delicate ornaments in soft tissue paper.
- Avoid placing heavy decorations on top of them.
Frequently Asked Questions
Is this crochet Christmas tree ornament pattern suitable for beginners?
It is best for confident beginners who know single crochet, double crochet, chains, slip stitches, and basic increases. Joining the separate layers requires a little extra care.
What yarn is best for a crochet Christmas tree?
Medium-weight cotton or acrylic yarn works well. Choose a firm yarn that helps the layers hold their shape.
What crochet hook size should I use?
A 4.0 mm hook is a useful starting point for medium-weight yarn. Adjust the hook to suit your yarn and tension.
How big is the finished crochet tree?
The sample design is approximately 3.5–4 inches tall, excluding the hanging loop. The final size depends on your yarn, hook, and layer dimensions.
Can I make a crochet Christmas tree without beads?
Yes. You can leave the tree plain or decorate it with small bows, yarn garlands, or embroidered details instead.
Can I make a larger crochet Christmas tree ornament?
Yes. Use thicker yarn and a larger hook, or add more branch layers. Make sure the lower layers are wider than the upper ones.
How do I attach the star to the top?
Position the star at the top center and sew it securely using the yarn tail. Check that it faces forward before finishing.
Can I use these mini trees as handmade gifts?
Absolutely. Make a set in different colors and package them in a small gift box. They are lovely handmade gifts for the holiday season.
Can I sell finished crochet Christmas tree ornaments?
You can sell finished handmade items subject to any terms that apply to the pattern you follow. If you use another designer’s instructions, check their usage guidelines.
Conclusion
This crochet Christmas tree ornament pattern is a lovely way to create small handmade decorations for the holiday season. The layered branches, little brown trunk, bright star, and festive details make each mini tree special.
Try traditional green and red, snowy cream, or elegant sage and gold. Make several trees in different colors and use them to decorate your Christmas tree, gifts, garlands, or holiday table.
Gather your yarn and crochet hook, follow the steps, and enjoy making your own collection of cute handmade Christmas tree ornaments!