Bring Christmas Cheer Home with a Handmade Poinsettia!
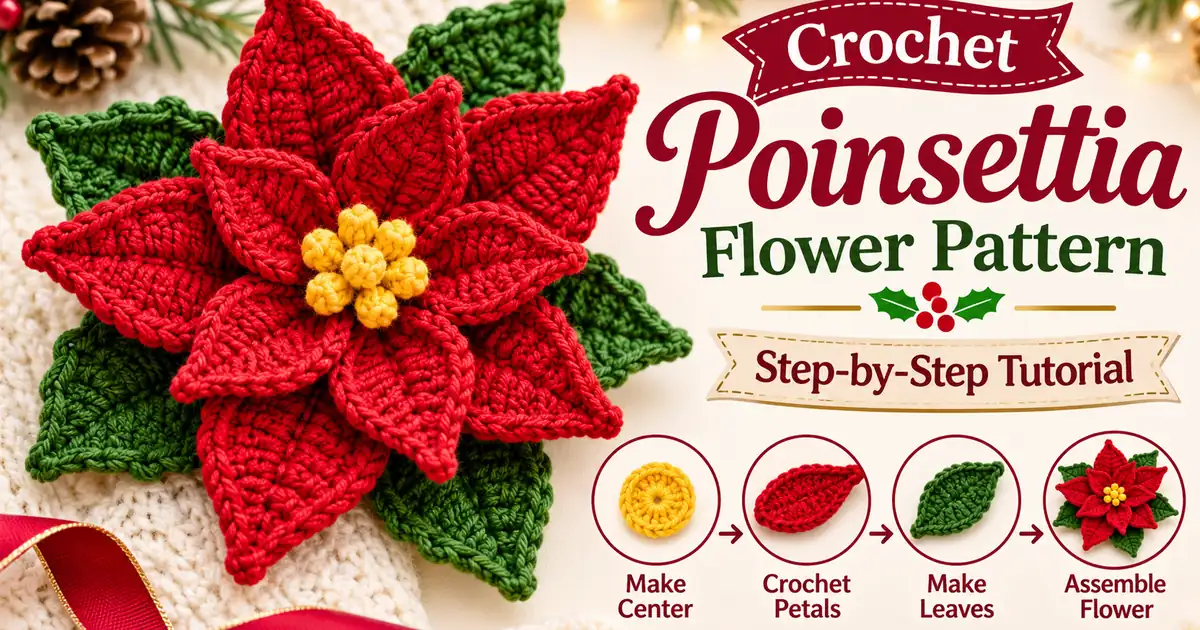
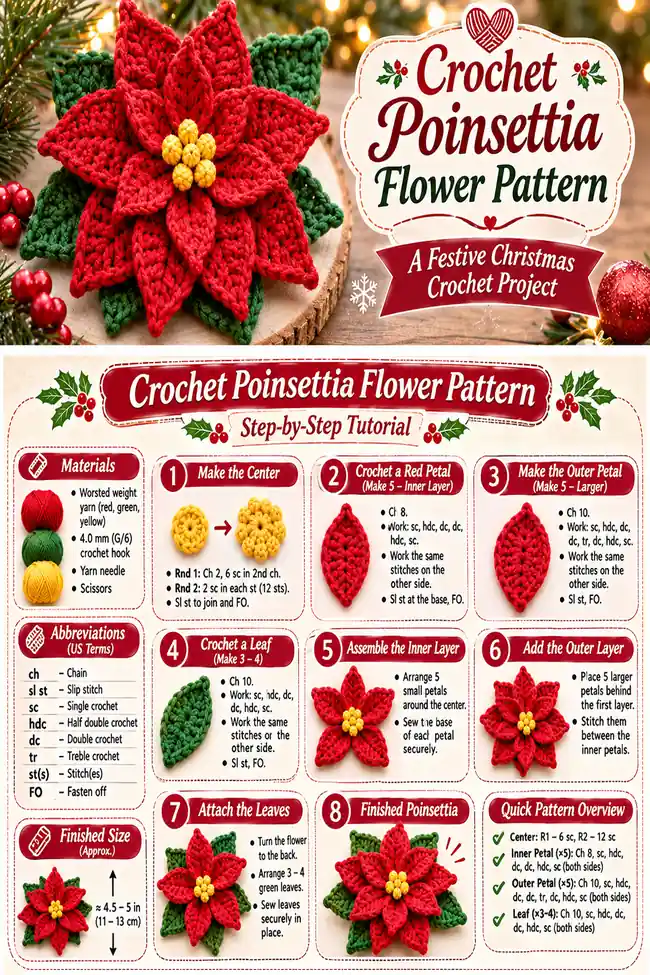
Want to add a beautiful handmade touch to your Christmas decorations? This Crochet Poinsettia Flower Pattern creates a festive red flower with layered petals, a golden center, and lovely green leaves.
Use it to decorate wreaths, garlands, gift packages, table settings, or your Christmas tree. The classic red and green colors make this crochet flower a wonderful seasonal project.
In this tutorial, you’ll learn how to make the flower center, crochet the petals and leaves, and assemble everything into a beautiful poinsettia decoration.
Why You’ll Love This Crochet Poinsettia Flower
Poinsettias are among the most recognizable flowers of the Christmas season. Their rich red petals and deep green leaves make them a beautiful choice for festive decorations.
A handmade crochet poinsettia gives you the same seasonal feeling with the added charm of yarn texture. You can make one large flower for a wreath or create several smaller flowers for garlands, gift wrapping, and table decorations.
- Beautiful layered petals for a full flower appearance.
- A contrasting center that makes the petals stand out.
- Green crochet leaves for a realistic festive look.
- Customizable colors and flower sizes.
- Useful for wreaths, garlands, gift toppers, and home decor.
Materials Needed for a Crochet Poinsettia
Gather your yarn and crochet supplies before starting. You only need small amounts of each color, which makes this a lovely project for using leftover yarn.
- Red medium-weight yarn for the petals.
- Green medium-weight yarn for the leaves.
- Yellow or gold yarn for the center.
- 4.0 mm crochet hook, adjusted to suit your yarn.
- Scissors.
- Yarn needle.
- Stitch markers, optional.
- Small amount of stuffing, optional.
- Small beads for the center, optional and securely attached.
Color suggestion: Use deep Christmas red, forest green, and golden yellow for a traditional poinsettia appearance.
Choosing the Best Yarn
Medium-weight cotton or acrylic yarn works well for this decorative flower. The best choice depends on the look you want and where you plan to display your poinsettia.
Cotton Yarn
Cotton yarn provides clear stitch definition and helps the petals hold their shape. It is a good choice for flowers that will be used on table decorations or wreaths.
Acrylic Yarn
Acrylic yarn is available in many festive colors and can create soft, flexible petals. Choose a yarn that is not too fluffy so the stitch details remain visible.
Choosing the Right Colors
Traditional poinsettias have red petals and green leaves, but you can also make cream, white, burgundy, or blush versions. Gold or yellow yarn gives the flower center a beautiful contrast.
Finished Size and Gauge
A finished poinsettia made with medium-weight yarn and a 4.0 mm hook may measure approximately 4.5 to 5 inches across. The final size depends on your yarn, hook, tension, and number of petals.
| Detail | Approximate measurement |
|---|---|
| Flower width | 4.5–5 inches |
| Petal length | 1.5–2 inches |
| Leaf length | 1.5–2 inches |
| Yarn weight | Medium-weight |
| Hook size | 4.0 mm |
| Skill level | Confident beginner |
| Construction | Separate petals and leaves assembled around a center |
Gauge is not critical for this decorative project. However, keep your stitches even so the petals and leaves have a similar size.
Crochet Abbreviations (US Terms)
This pattern uses common US crochet terminology. Review these abbreviations before starting.
| Abbreviation | Meaning |
|---|---|
| ch | Chain |
| sl st | Slip stitch |
| sc | Single crochet |
| hdc | Half double crochet |
| dc | Double crochet |
| tr | Treble crochet |
| st | Stitch |
| sts | Stitches |
| FO | Fasten off |
How to Crochet a Poinsettia Flower
This poinsettia is made from separate crochet pieces. First, you will create a small center, then make individual red petals and green leaves. Finally, you will arrange and sew the pieces together to create a full flower.
- Make the yellow center.
- Crochet the first red petal.
- Make four more petals for the inner layer.
- Make five larger petals for the outer layer.
- Crochet three or four green leaves.
- Arrange and attach the petals.
- Attach the leaves behind the flower.
- Finish and shape the poinsettia.
Step-by-Step Crochet Poinsettia Pattern
Part 1: Make the Yellow Flower Center
- Take your yellow or gold yarn.
- Make a magic ring.
- Chain 1.
- Work 6 single crochet stitches into the ring.
- Pull the yarn tail to close the center.
- Join with a slip stitch to the first single crochet.
You should have a small, round center with six stitches.
- Chain 1.
- Work 2 single crochet stitches into each stitch around.
- You should now have 12 stitches.
- Join with a slip stitch.
- Fasten off, leaving a sewing tail.
For a more decorative center, you can make several tiny yellow knots or small crochet bobbles and attach them securely after the flower is assembled.
Part 2: Crochet the Red Petals
The poinsettia looks fuller when the petals have pointed tips and rounded sides. Make each petal separately, then sew them around the flower center.
- Using red yarn, chain 8.
- Work 1 single crochet into the second chain from your hook.
- Work 1 half double crochet into the next chain.
- Work 1 double crochet into each of the next 2 chains.
- Work 1 half double crochet into the next chain.
- Work 1 single crochet into the last chain.
- Chain 1 and turn.
Work back along the opposite side of the foundation chain with matching stitches to create an oval-shaped petal. Slip stitch at the base and fasten off, leaving a long sewing tail.
Ch 8, sc in second ch, hdc in next ch, dc in next 2 ch, hdc in next ch, sc in last ch. Ch 1, turn, and work back along the opposite side of the foundation chain with matching stitches.
- Repeat the first petal instructions.
- Make a total of five matching petals.
- Keep the size and stitch tension consistent.
- Leave a long yarn tail on each petal for sewing.
Part 3: Make the Larger Outer Petals
The second layer gives the poinsettia its full, layered appearance. These petals should be slightly longer than the inner petals.
- With red yarn, chain 10.
- Work 1 single crochet into the second chain from your hook.
- Work 1 half double crochet into the next chain.
- Work 1 double crochet into the next 3 chains.
- Work 1 treble crochet into the next chain.
- Work 1 double crochet into the next chain.
- Work 1 half double crochet into the next chain.
- Work 1 single crochet into the last chain.
- Chain 1 and turn.
Work along the opposite side of the foundation chain using a matching sequence to complete the petal. Fasten off with a long sewing tail.
- Repeat the larger petal instructions.
- Make five matching outer petals.
- Check that each petal is slightly longer than the inner petals.
- Keep the sewing tails long enough for assembly.
Part 4: Crochet the Green Leaves
Green leaves complete the traditional poinsettia look. Make three or four leaves and attach them behind the red petals.
- With green yarn, chain 10.
- Work 1 single crochet into the second chain from your hook.
- Work 1 half double crochet into the next chain.
- Work 1 double crochet into each of the next 3 chains.
- Work 1 half double crochet into the next chain.
- Work 1 single crochet into the next chain.
- Slip stitch into the final chain.
Work along the opposite side of the foundation chain with a matching sequence to create the other side of the leaf. Slip stitch at the base and fasten off.
- Repeat the leaf instructions three or four times.
- Keep the leaves similar in size.
- Leave a sewing tail on each leaf.
- Gently shape each leaf with your fingers.
How to Assemble the Crochet Poinsettia
Once all the pieces are complete, arrange them before sewing. This makes it easier to create a balanced flower with evenly spaced petals.
- Place the yellow center on your work surface.
- Arrange the five smaller red petals around it.
- Position the base of each petal close to the center.
- Overlap the petals slightly if needed.
- Sew the petal bases securely to the back of the center.
- Turn the flower over.
- Arrange the five larger petals behind the first layer.
- Position them between the inner petals.
- Make sure the larger petal tips remain visible.
- Sew the bases securely together.
- Turn the flower to the back.
- Arrange three or four green leaves behind the outer petals.
- Space them evenly around the flower.
- Sew each leaf securely to the flower base.
- Check that the leaves are visible between the red petals.
- Check all the petal and leaf attachments.
- Weave in loose yarn ends securely.
- Turn the flower to the front.
- Gently shape the petals and leaves.
- Add optional small yellow details to the center.
How to Make Your Poinsettia Look Fuller
A full poinsettia has layers of petals that sit at slightly different angles. You can create this effect by overlapping the petal bases and gently lifting the petal tips.
- Keep the inner petals slightly smaller than the outer petals.
- Arrange the outer petals between the inner petals.
- Allow a little space between the petal tips.
- Keep the center compact and secure.
- Position the green leaves so they show behind the red petals.
Beautiful Color Ideas for Crochet Poinsettia Flowers
Traditional red poinsettias are beautiful, but you can create several versions to match your Christmas decorations.
1. Classic Red and Green
Use deep red petals, forest green leaves, and a golden yellow center. This is the traditional poinsettia combination and looks lovely on Christmas wreaths.
2. White and Green Poinsettia
Choose ivory or snowy white petals with dark green leaves. A yellow center adds a soft festive contrast.
3. Burgundy and Cream
Rich burgundy petals paired with cream details create an elegant flower for a neutral Christmas theme.
4. Blush Pink Poinsettia
Soft pink petals and sage green leaves create a gentle, modern holiday decoration. Use a cream or gold center to complete the look.
5. All-White Christmas Flower
Make the petals white, the leaves ivory, and the center pale gold. This version looks beautiful with silver and natural holiday decorations.
Creative Ways to Use Crochet Poinsettia Flowers
Once you have made your poinsettia, there are many ways to use it around your home during the holiday season.
- Christmas wreath: Attach one large flower to a handmade wreath.
- Garland: Make several small poinsettias and join them along a decorative cord.
- Gift wrapping: Sew a small flower onto a ribbon or gift tag.
- Table decoration: Use a poinsettia as a centerpiece accent.
- Christmas tree: Add a small hanging loop to display the flower as an ornament.
- Decorative cushion: Sew the flower onto a cushion cover.
- Hair accessory: Attach a smaller flower securely to a suitable clip.
Common Crochet Poinsettia Mistakes
1. The Petals Look Uneven
Uneven petals can happen when the chain length or stitch sequence changes. Count your stitches carefully and use the same instructions for every petal in a layer.
2. The Flower Center Looks Too Large
A large center can cover too much of the petals. Keep the center compact and avoid adding too many extra rounds.
3. The Petals Curl Inward
Your tension may be too tight. Try a slightly larger hook or relax your stitches. Gently shape the petals before assembly.
4. The Flower Looks Flat
Make sure the petals overlap slightly and are arranged in two layers. The larger petals should sit behind the smaller petals.
5. The Leaves Are Hidden
Position the green leaves behind the outer petals and leave enough of their tips visible. Check the arrangement before sewing them permanently.
6. The Flower Does Not Hold Its Shape
Use consistent yarn and secure the petal bases carefully. For a decoration that will be handled often, reinforce the center stitching.
How to Care for Your Crochet Poinsettia
Keep your handmade flower looking beautiful by storing it carefully between Christmas seasons.
- Remove dust gently with a soft brush.
- Spot-clean according to your yarn manufacturer’s instructions.
- Avoid pulling or stretching the petals.
- Allow the flower to dry completely if it becomes damp.
- Store it flat in a clean, dry container.
- Keep delicate decorations and beads securely attached.
Frequently Asked Questions
Is this crochet poinsettia pattern suitable for beginners?
This project is best for confident beginners who know how to make chains, single crochet, half double crochet, double crochet, and slip stitches. The separate petals and leaves are assembled after crocheting.
What yarn is best for a crochet poinsettia?
Medium-weight cotton or acrylic yarn works well. Choose yarn with clear stitch definition so the petal shapes remain visible.
What crochet hook size should I use?
A 4.0 mm crochet hook is a useful starting point for medium-weight yarn. Adjust the size to suit your yarn and tension.
How many petals does a crochet poinsettia need?
This sample design uses five smaller inner petals and five larger outer petals. You can change the number to create a fuller or simpler flower.
How many leaves should I make?
Three or four green leaves are a good starting point. Arrange them behind the outer petals so they remain visible.
Can I make a white crochet poinsettia?
Yes. White or ivory petals with green leaves and a gold center create a beautiful alternative to the traditional red flower.
Can I use this flower for a Christmas wreath?
Yes. Sew the flower securely to a wreath base or attach it to a removable backing. Make sure it is firmly attached before displaying it.
Can I make smaller poinsettia flowers?
Yes. Use a smaller hook and thinner yarn, or shorten the foundation chains to create smaller petals. Make a sample first to check the proportions.
Can I sell finished crochet poinsettia flowers?
You can make finished items for personal use or sale, subject to any terms that apply to the pattern you follow. If you use someone else’s pattern, check its usage guidelines first.
Conclusion
This crochet poinsettia flower pattern is a lovely way to bring handmade Christmas charm into your home. With layered red petals, a golden center, and green leaves, the finished flower makes a beautiful seasonal decoration.
Make a traditional red poinsettia, experiment with white or burgundy shades, or create several flowers for a wreath or garland. Each handmade flower can be customized to match your holiday style.
Gather your yarn and crochet hook, follow the steps, and enjoy creating your own beautiful crochet poinsettia for Christmas!