Make a Handmade Stocking for a Cozy Christmas!
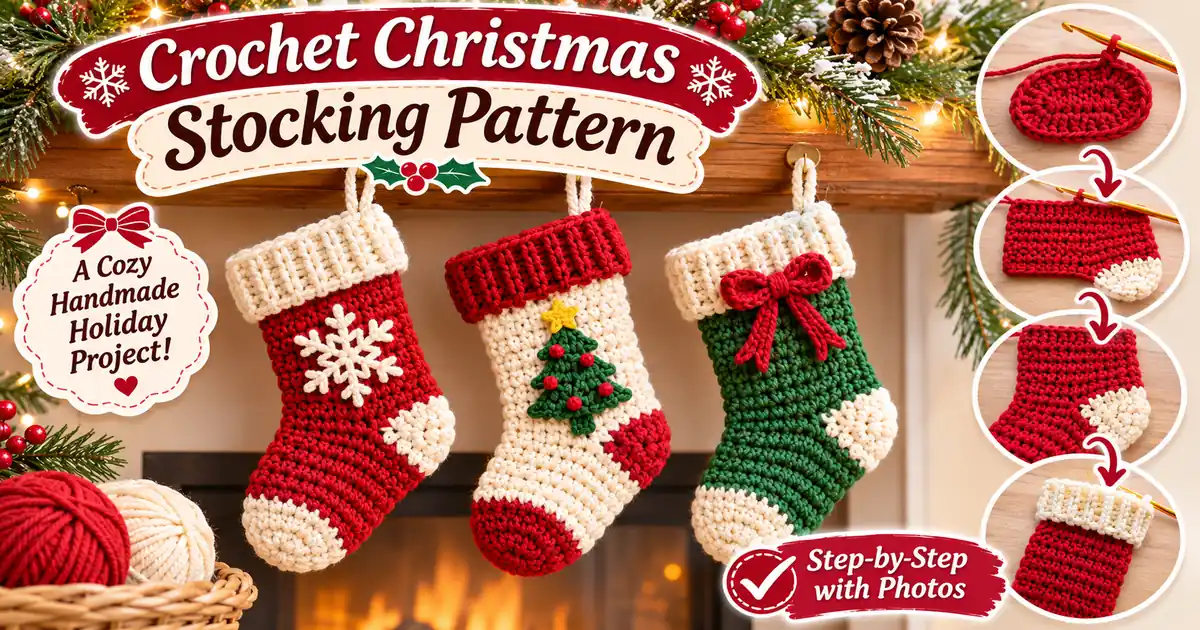
Nothing makes Christmas feel more special than handmade decorations! This Crochet Christmas Stocking Pattern is a lovely project for creating a festive stocking to hang by your fireplace, decorate your home, or fill with little holiday surprises.
Choose traditional red, forest green, and cream yarn to create a classic Christmas look. Add a soft folded cuff, a hanging loop, and your favorite decorative details.
In this tutorial, you’ll discover the materials, crochet stitches, step-by-step construction, and finishing tips to make your own beautiful Christmas stocking.
Why You’ll Love This Crochet Christmas Stocking
Christmas stockings are one of those decorations that instantly make a home feel festive. A handmade crochet stocking adds warmth, texture, and personality to your holiday decorations.
This design uses a simple crocheted cuff and leg with a separate foot section. It is a lovely project for practicing basic stitches, working in rounds, and learning how to join crochet pieces neatly.
- Classic Christmas colors and a cozy handmade appearance.
- A soft folded cuff for a traditional stocking look.
- A separate foot section to create the stocking shape.
- Optional heel patch and decorative details.
- A hanging loop for displaying your finished stocking.
- Easy color customization for different holiday themes.
Materials Needed for a Crochet Christmas Stocking
Before starting your crochet Christmas stocking pattern, gather all your supplies. Choose yarn that is sturdy enough to hold its shape but soft enough to create a comfortable handmade decoration.
- Medium-weight worsted yarn in red, green, or cream.
- A small amount of contrasting yarn for the cuff and toe.
- 5.0 mm crochet hook, or the size recommended for your yarn.
- Scissors.
- Yarn needle for sewing and weaving in ends.
- Stitch markers.
- Measuring tape.
- Optional small buttons, bows, or appliques for decoration.
Suggested colors: Cherry red, forest green, ivory, snowy white, and soft beige are beautiful choices for a traditional Christmas stocking.
Choosing the Best Yarn
The right yarn makes a big difference in how your Christmas stocking looks and holds its shape. Medium-weight yarn is a useful starting point because it creates a substantial fabric without making the stocking too heavy.
Worsted-Weight Acrylic Yarn
Acrylic yarn is widely available in festive colors and is easy to work with. It is a practical choice for decorative stockings that will be used year after year.
Cotton Yarn
Cotton yarn creates clear stitch definition and a firmer fabric. It can work beautifully for smaller stockings and decorative holiday projects.
Mixing Christmas Colors
Try a red body with a cream cuff, a green body with a white cuff, or an ivory stocking with a red toe. You can also use the same color throughout and add a contrasting decorative border.
Finished Size and Gauge
This tutorial is designed for a small decorative Christmas stocking. The finished size can vary depending on yarn thickness, hook size, and your tension.
| Detail | Approximate measurement |
|---|---|
| Stocking height | 7–8 inches |
| Top opening | 4–4.5 inches across |
| Foot length | 4–5 inches |
| Yarn weight | Medium worsted |
| Hook size | 5.0 mm |
| Skill level | Beginner to intermediate |
| Construction | Cuff, leg tube, foot, and finishing pieces |
Gauge is not critical for a decorative stocking, but consistent stitches help the stocking maintain its shape. Make a small swatch if you want to check the fabric before beginning.
Crochet Abbreviations (US Terms)
Here are the abbreviations used throughout this Christmas stocking pattern.
| Abbreviation | Meaning |
|---|---|
| ch | Chain |
| sl st | Slip stitch |
| sc | Single crochet |
| hdc | Half double crochet |
| dc | Double crochet |
| st | Stitch |
| sts | Stitches |
| rep | Repeat |
| sc2tog | Single crochet two stitches together |
| FO | Fasten off |
How the Crochet Christmas Stocking Is Made
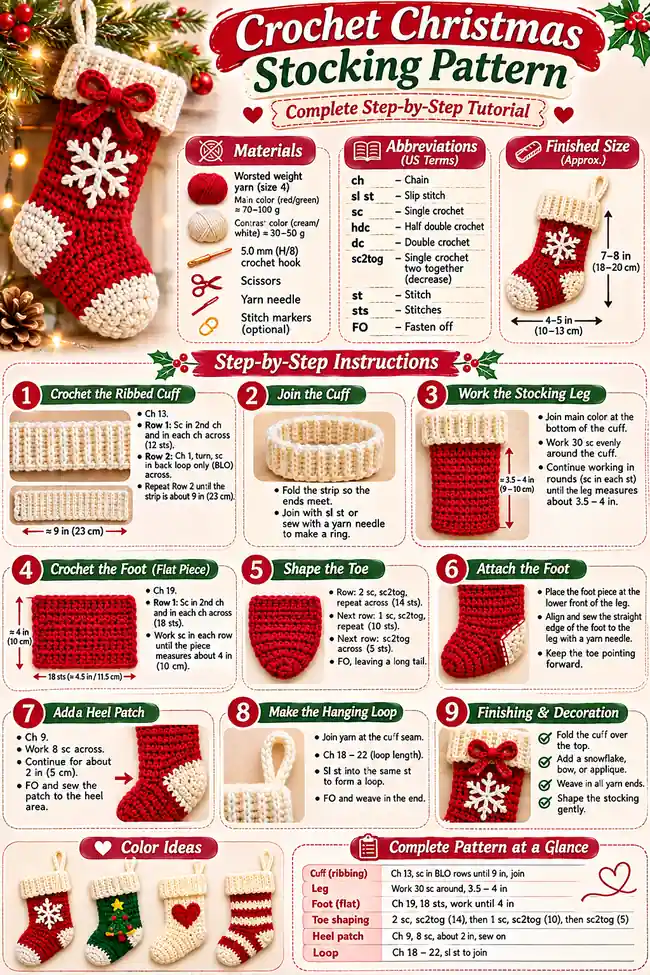
This stocking is made in separate sections and then joined together. The cuff and leg form the upper part, while the foot section extends forward to create the familiar stocking shape. A decorative heel patch can be added to complete the appearance.
- Make a ribbed cuff.
- Join the cuff into a ring.
- Work the stocking leg in rounds.
- Make the foot section separately.
- Join the foot to the lower opening of the leg.
- Add a heel patch and toe details.
- Finish with a hanging loop and decorative trim.
Step-by-Step Crochet Christmas Stocking Pattern
Part 1: Make the Ribbed Cuff
- Using your cuff color, make a foundation chain of 13 stitches.
- Work one single crochet into the second chain from your hook.
- Work one single crochet into each remaining chain.
- You should have 12 single crochet stitches.
- Chain 1 and turn your work.
- Work one single crochet into the back loop only of each stitch.
- Repeat this row until the ribbed strip reaches approximately 9 inches.
- Keep the rows even so the cuff has a consistent texture.
The back-loop stitches create the raised vertical ridges that give the cuff its ribbed appearance.
- Fold the ribbed strip so its short ends meet.
- Join the ends with slip stitches or a yarn needle.
- Keep the seam neat and secure.
- You should now have a circular cuff.
Part 2: Crochet the Stocking Leg
- Turn the cuff so the working edge is accessible.
- Join your main stocking color around the lower edge.
- Work approximately 30 single crochet stitches evenly around the cuff.
- Join with a slip stitch to the first stitch.
Adjust the stitch count if necessary to fit your cuff evenly. Avoid bunching or stretching the edge.
- Chain 1. This does not count as a stitch.
- Work one single crochet into each stitch around.
- Join with a slip stitch to the first single crochet.
- Repeat the round until the leg measures approximately 3.5–4 inches below the cuff.
Keep your tension consistent so the stocking leg stays straight.
Part 3: Make the Foot Section
The foot is worked separately as a flat piece. It will be attached to the lower front of the stocking leg to create the projecting foot shape.
- Using the main stocking color, make a chain of 19 stitches.
- Work one single crochet into the second chain from your hook.
- Work one single crochet into each remaining chain.
- You should have 18 single crochet stitches.
- Chain 1 and turn.
- Work one single crochet into each stitch across.
- Chain 1 and turn after each row.
- Repeat until the piece measures approximately 4 inches.
- Keep the edges straight and the stitches even.
- On the next row, work one single crochet into the first two stitches.
- Work sc2tog over the next two stitches.
- Continue alternating single crochet stitches and decreases evenly across the row.
- Repeat a decrease row if needed until the toe becomes gently rounded.
- Fasten off, leaving a long sewing tail.
Part 4: Join the Foot to the Leg
- Place the foot piece against the lower front of the stocking leg.
- Position the straight end of the foot at the lower edge of the leg.
- Use stitch markers to hold the pieces in place.
- Check that the toe points forward and the piece is centered.
- Thread the long yarn tail onto a yarn needle.
- Sew the straight edge of the foot to the lower front opening.
- Use small, even stitches.
- Secure the seam and weave in the yarn end.
Keep the foot attachment neat so the stocking holds its shape when displayed.
Part 5: Add a Decorative Heel Patch
- Choose a contrasting color such as cream or white.
- Make a foundation chain of 9 stitches.
- Work 8 single crochet stitches across.
- Continue in rows until the patch is approximately 2 inches long.
- Fasten off, leaving a sewing tail.
- Position the patch at the back or side of the heel area.
- Pin it in place with stitch markers.
- Sew around the edges with small stitches.
- Secure the yarn and weave in the end.
How to Add the Folded Christmas Stocking Cuff
The ribbed cuff can be folded outward to create a traditional stocking appearance. If you prefer a decorative edge, add a contrasting row of single crochet stitches along the top edge.
- Fold the cuff evenly over the top of the stocking.
- Make sure the fold is the same depth all around.
- Use a few discreet stitches to hold it in place if needed.
- Add a small bow or button for extra decoration.
How to Make a Hanging Loop
A hanging loop makes it easy to display your finished stocking on a mantel, Christmas tree, or decorative hook.
- Join yarn at the inside edge of the cuff seam.
- Chain 18–22 stitches, depending on your preferred loop size.
- Slip stitch back into the same area to secure the loop.
- Fasten off and weave in the end securely.
Beautiful Christmas Stocking Color Ideas
Traditional Christmas shades make this crochet Christmas stocking pattern look festive, but you can also experiment with modern and neutral color combinations.
1. Classic Red and White
Use a bright red body with a white folded cuff and toe. This timeless combination looks beautiful on a fireplace mantel.
2. Forest Green and Cream
A deep green body with a cream cuff gives your stocking a cozy woodland-inspired appearance. Add small red details for a traditional holiday finish.
3. Burgundy and Ivory
Choose rich burgundy yarn with an ivory cuff for a warm and elegant Christmas decoration.
4. Cream and Beige
For a neutral holiday look, use cream and beige yarn. This combination works well with natural wood decorations and simple Christmas interiors.
5. Red, Green, and Gold
Combine red and green yarn with small gold-colored decorative details. This creates a festive stocking with a traditional holiday feel.
Creative Ways to Decorate Your Crochet Stocking
Once the basic stocking is finished, add small details to make it unique. Choose lightweight decorations that will not stretch the crochet fabric.
Add a Crochet Snowflake
Make a small white snowflake applique and sew it onto the front of the stocking. It looks beautiful against red or green yarn.
Add a Mini Christmas Tree
Use green yarn to create a small tree applique. Add tiny red or gold stitches to represent ornaments.
Decorate with a Crochet Bow
A small red bow looks lovely on a cream or green stocking. You can also attach a bow near the folded cuff.
Make Personalized Stockings
Use simple embroidered initials or small name tags to personalize each stocking for family members. Make sure the details are securely attached.
Create Mini Stocking Ornaments
Use the same design in smaller dimensions to create miniature Christmas tree ornaments. They are lovely additions to handmade gift wrapping.
Common Crochet Christmas Stocking Mistakes
1. The Cuff Looks Uneven
Uneven ribbing can happen when the row tension changes. Keep the same number of stitches in each row and measure the strip before joining it.
2. The Stocking Leg Is Too Loose
Try using a slightly smaller hook or adjusting your tension. The fabric should be flexible but firm enough to hold its shape.
3. The Foot Does Not Sit Straight
Check the placement of the foot before sewing. Use stitch markers to keep it centered and make sure the toe points forward.
4. The Heel Patch Looks Bulky
Choose lightweight yarn for the patch and use small sewing stitches. Avoid adding too many layers around the heel.
5. The Hanging Loop Feels Weak
Reinforce the loop with additional stitches around its base. Make sure the yarn ends are woven in securely.
How to Make Different Stocking Sizes
You can customize the stocking to suit different decorating needs. A small version is perfect for a Christmas tree, while a larger stocking can be used as a decorative gift holder.
| Stocking type | Suggested use |
|---|---|
| Mini stocking | Tree ornaments and gift tags |
| Small stocking | Decorative mantel display |
| Medium stocking | Small holiday treats and gifts |
| Large stocking | Traditional Christmas decoration |
To make a larger stocking, increase the cuff length, add more rounds to the leg, and make the foot section wider and longer. Keep the proportions balanced so the stocking does not become too narrow or too bulky.
How to Care for Your Crochet Christmas Stocking
Proper care helps handmade holiday decorations stay beautiful from one Christmas season to the next. Always follow the yarn manufacturer’s washing instructions.
- Remove loose dust with a soft brush.
- Spot-clean small marks gently when appropriate for the yarn.
- Wash only according to the yarn label.
- Allow the stocking to dry completely before storing.
- Keep decorative buttons and attachments secure.
- Store flat in a clean, dry container.
Frequently Asked Questions
Is this crochet Christmas stocking pattern suitable for beginners?
This design is best for beginners who are comfortable with single crochet, chains, slip stitches, and basic sewing. The separate sections make it easier to understand how the stocking is assembled.
What yarn is best for crochet Christmas stockings?
Medium-weight acrylic or cotton yarn can work well. Acrylic offers a wide range of festive colors, while cotton creates clear stitch definition and a firmer fabric.
What crochet hook size should I use?
A 5.0 mm hook is a useful starting point for medium-weight yarn. Adjust your hook size according to your yarn label and the firmness of your stitches.
How long does it take to crochet a Christmas stocking?
The time depends on your experience, yarn thickness, and stocking size. A small decorative stocking generally takes less time than a larger, detailed design.
Can I make this stocking in different colors?
Yes. Red, green, cream, white, and burgundy are lovely Christmas choices. You can also use neutral shades for a modern holiday decoration.
Can I make a mini crochet Christmas stocking?
Yes. Use thinner yarn, a smaller hook, and fewer stitches to create a miniature version for tree decorations or gift wrapping.
Can I use this stocking as a gift holder?
Yes, for lightweight treats and small gifts. Reinforce the seams and hanging loop if you plan to place anything inside it.
How do I make the stocking look more festive?
Add a contrasting cuff, a small snowflake, a crochet bow, a mini Christmas tree, or a decorative hanging loop.
Can I sell finished crochet Christmas stockings?
You can make finished items for personal use or sale, subject to any terms that apply to the pattern you follow. If you use another designer’s pattern, check its usage guidelines first.
Conclusion
This crochet Christmas stocking pattern is a lovely way to add handmade charm to your holiday decorations. With its ribbed cuff, cozy leg, shaped foot, and decorative details, it gives you plenty of opportunities to customize your own festive design.
Try traditional red and white, forest green and cream, or a beautiful neutral combination. Make a single stocking for your mantel or create a matching set for your family.
Gather your yarn and crochet hook, enjoy the process, and make a special handmade decoration for the Christmas season!