Make a Beautiful Handmade Wreath for the Holidays!
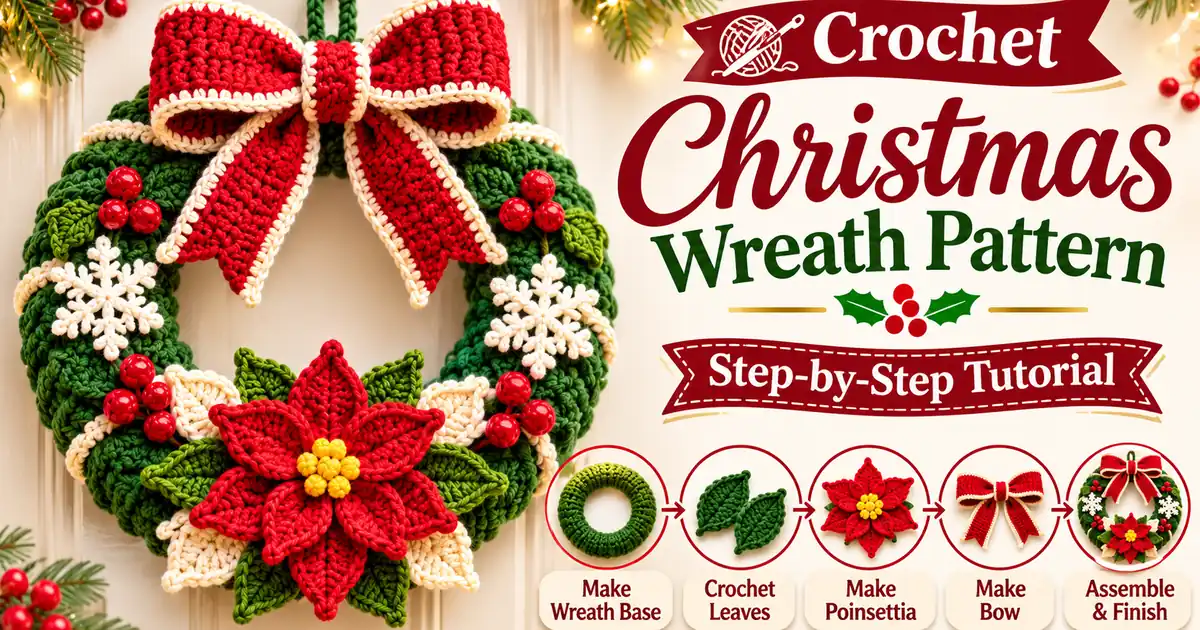
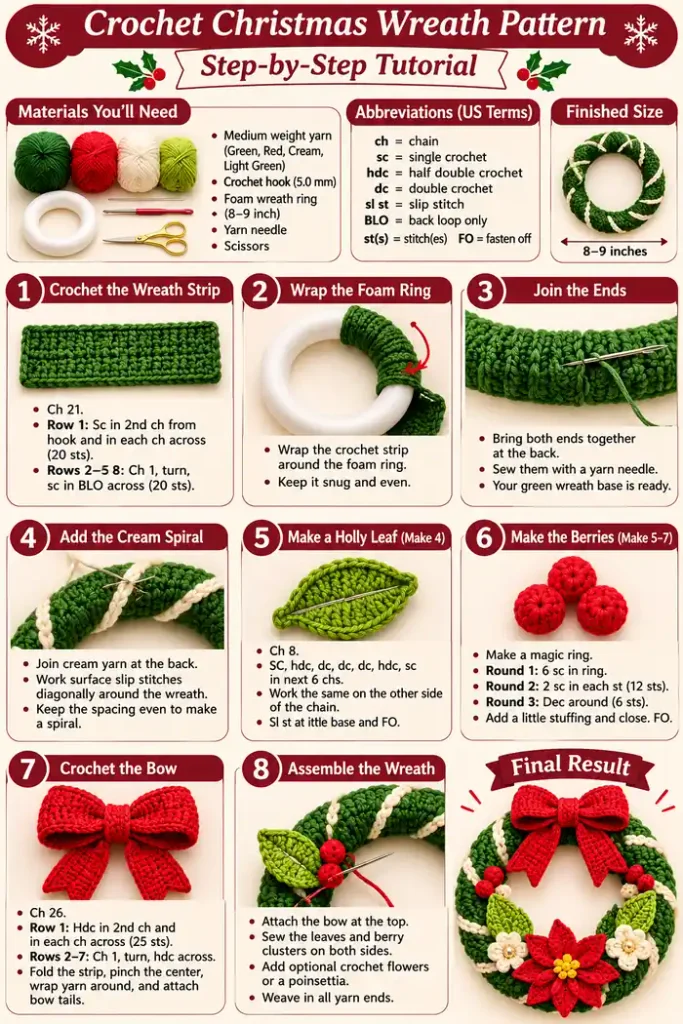
Add a cozy handmade touch to your holiday home with this Crochet Christmas Wreath Pattern. This festive design features a textured green wreath base, a pretty cream spiral, bright red berries, holly leaves, and a decorative bow.
Hang your finished wreath on a door, above a mantel, or use it as a cheerful Christmas wall decoration. You can also customize the colors and add a crochet flower to make it your own.
In this tutorial, you’ll learn how to crochet the wreath cover, make the leaves and berries, create the bow, and assemble all the pieces into one beautiful Christmas decoration.
Why You’ll Love This Crochet Christmas Wreath
A Christmas wreath is a lovely way to welcome the holiday season. This handmade version combines a cozy green crochet base with a cream spiral, red berries, decorative leaves, and a festive bow.
You can hang it on your front door, display it above a fireplace, or use it as part of your Christmas wall decor. The decorations are customizable, so you can make a traditional red-and-green wreath or choose a softer cream and sage color palette.
- A textured crochet wreath cover with a neat circular shape.
- A contrasting spiral detail for a festive appearance.
- Handmade holly leaves and little red berries.
- A decorative bow for the top of the wreath.
- Optional crochet flowers and snowflakes.
- A lovely handmade Christmas gift or seasonal decoration.
Materials Needed for a Crochet Christmas Wreath
Gather your yarn and supplies before starting. This design uses a foam wreath form as its base, which helps the finished decoration keep a round shape.
- Medium-weight green yarn for the wreath cover.
- Cream or white yarn for the spiral detail.
- Red yarn for berries and the bow.
- Small amounts of light green yarn for holly leaves.
- 5.0 mm crochet hook.
- 8–9 inch foam wreath form.
- Scissors.
- Yarn needle.
- Stitch markers.
- Optional small crochet flowers or decorative buttons.
Color suggestion: Forest green, bright red, cream, and a little light green create a classic Christmas look.
Choosing the Best Yarn
Medium-weight yarn works well for this project because it creates a thick, attractive crochet texture. Choose yarn that is easy to handle and has consistent thickness.
Green Yarn for the Wreath
Choose a deep forest green or Christmas green. A solid shade makes the cream spiral and red decorations stand out beautifully.
Cream Yarn for the Detail
Cream or ivory yarn creates a soft contrast against the green base. You can use it for the spiral, small flowers, or decorative edging.
Red Yarn for the Decorations
Use red yarn for the berries and bow. A rich cherry red gives the wreath a traditional holiday appearance.
Finished Size and Gauge
The sample wreath is designed for an 8–9 inch foam ring. The finished size will depend on the thickness of your cover and how tightly you wrap or sew it around the form.
| Detail | Approximate measurement |
|---|---|
| Foam ring diameter | 8–9 inches |
| Cover strip width | Approximately 3 inches |
| Cover strip length | Approximately 58 rows |
| Yarn weight | Medium-weight |
| Hook size | 5.0 mm |
| Skill level | Confident beginner |
| Construction | Flat crochet strip wrapped around a foam ring |
Because foam wreath forms vary in thickness, the strip length is an estimate. Measure your own ring as you work and add or remove rows to achieve a snug fit.
Crochet Abbreviations (US Terms)
| Abbreviation | Meaning |
|---|---|
| ch | Chain |
| sl st | Slip stitch |
| sc | Single crochet |
| hdc | Half double crochet |
| dc | Double crochet |
| st | Stitch |
| sts | Stitches |
| BLO | Back loop only |
| rep | Repeat |
| FO | Fasten off |
How to Crochet a Christmas Wreath
This wreath is made in several stages. First, crochet a long ribbed strip and wrap it around the foam ring. Then add the cream spiral, leaves, berries, and bow. Finally, sew the decorations securely onto the base.
- Crochet the green wreath cover.
- Join the strip around the foam ring.
- Add the cream spiral detail.
- Make the holly leaves.
- Crochet the red berries.
- Make the decorative bow.
- Arrange and attach the decorations.
- Add the hanging loop and finish.
Step-by-Step Crochet Christmas Wreath Pattern
Part 1: Crochet the Green Wreath Cover
- Take your green yarn and 5.0 mm crochet hook.
- Make a slip knot.
- Chain 21 stitches.
- Work one single crochet into the second chain from your hook.
- Work one single crochet into every remaining chain.
You should have 20 single crochet stitches in the first row.
- Chain 1 and turn your work.
- Work one single crochet into the back loop only of each stitch.
- You should have 20 stitches in the row.
- Repeat this row, keeping the same stitch count.
- Continue until the strip measures approximately 3 inches wide and is long enough to wrap around your foam ring.
For an 8–9 inch ring, approximately 58 rows may be a useful starting estimate. Check the fit against your own wreath form rather than relying only on the row count.
Foundation: Ch 21.
Row 1: Sc in second ch from hook and in each ch across (20 sts).
Rows 2 onward: Ch 1, turn, sc in BLO across (20 sts).
Repeat until the strip wraps comfortably around the foam ring.
Part 2: Join the Cover Around the Ring
- Place the foam wreath form on a flat surface.
- Wrap the green strip around the outside of the ring.
- Bring the short ends together at the back.
- Check that the foam is fully covered.
- Adjust the strip if it feels too loose or too tight.
- Thread the long yarn tail onto a yarn needle.
- Join the short ends with small mattress stitches or whip stitches.
- Keep the seam on the back of the wreath.
- Secure the yarn and weave in the loose end.
- Smooth the cover around the ring.
Part 3: Add the Cream Spiral Detail
- Choose the back seam as your starting point.
- Join cream yarn with a slip stitch.
- Bring the yarn to the front of the wreath cover.
- Work a surface slip stitch diagonally across the green fabric.
- Continue moving around the ring to create a spiral effect.
Keep the diagonal lines evenly spaced. Avoid pulling the yarn too tightly, as this may distort the wreath cover.
Part 4: Crochet the Holly Leaves
The green leaves add a classic Christmas detail. Make four leaves and arrange them in small pairs around the wreath.
- With light green yarn, chain 8.
- Work a slip stitch into the second chain from the hook.
- Work one single crochet into the next chain.
- Work one half double crochet into the next chain.
- Work one double crochet into each of the next three chains.
- In the final chain, work a small pointed tip using a double crochet, chain 2, and slip stitch.
Continue along the opposite side of the foundation chain using matching stitches to create the other half of the leaf. Slip stitch at the base and fasten off.
- Repeat the same leaf pattern three more times.
- Keep the leaves similar in size.
- Leave a sewing tail on each leaf.
- Gently shape the pointed ends with your fingers.
Part 5: Crochet the Red Berries
Small red berries add a bright festive touch. Make five to seven berries, depending on how full you want your wreath to look.
- With red yarn, make a magic ring.
- Work 6 single crochet stitches into the ring.
- Pull the ring closed.
- Work 2 single crochet stitches into each stitch around (12 sts).
- Work one decrease over every two stitches until 6 stitches remain.
- Add a tiny amount of stuffing before closing, if desired.
- Fasten off and close the remaining opening.
- Repeat the berry instructions until you have five to seven berries.
- Arrange them in small groups of two or three.
- Use the yarn tails to attach the berries together.
- Keep the attachment points secure.
Part 6: Make the Decorative Christmas Bow
A red bow makes a lovely focal point at the top of the wreath. You can add a cream border for extra contrast.
- With red yarn, chain 26.
- Work one half double crochet into the second chain from the hook.
- Work one half double crochet into every remaining chain (25 sts).
- Chain 1 and turn.
- Work one half double crochet into each stitch across.
- Repeat until you have seven rows in total.
- Fasten off, leaving a long tail.
- Lay the crochet rectangle flat.
- Bring both short ends toward the center.
- Pinch the center to create two loops.
- Wrap red yarn around the middle several times.
- Secure the yarn at the back.
- Adjust the loops until they look even.
- Make two smaller pointed strips or use matching ribbon.
- Attach one tail behind each side of the bow.
- Secure the ends firmly.
- Optional: add a cream surface slip-stitch border around the bow.
Part 7: Assemble the Christmas Wreath
- Place the wreath on a flat surface.
- Position the bow at the top.
- Arrange the holly leaves around the sides.
- Place the berry clusters beside the leaves.
- Add optional crochet flowers or snowflakes.
- Check the overall balance before sewing.
- Thread the yarn tails onto a yarn needle.
- Sew the bow securely to the wreath cover.
- Attach the holly leaves one by one.
- Sew the berry clusters near the leaves.
- Secure all decorative pieces at their bases.
- Weave in every loose yarn end.
Part 8: Add the Hanging Loop
- Join green yarn at the back of the wreath.
- Chain 18 stitches.
- Slip stitch into the same starting area.
- Fasten off.
- Reinforce the loop with a few extra sewing stitches.
Beautiful Color Ideas for Crochet Christmas Wreaths
You can change the colors to match your holiday decor. Here are some lovely combinations to try.
1. Traditional Red and Green
Use forest green for the wreath, cream for the spiral, and bright red for the berries and bow. Add a red poinsettia for a classic Christmas look.
2. Cream and Burgundy
Choose cream for the base, burgundy for the bow and berries, and muted green for the leaves. This combination looks elegant and cozy.
3. Sage Green and Ivory
Use sage green for the cover, ivory for the spiral, and a soft beige bow. This is a beautiful choice for neutral holiday decorations.
4. Red, White, and Gold
Combine a green base with red decorations, white details, and small gold accents. This creates a bright festive appearance.
Creative Ways to Decorate Your Crochet Wreath
Once the main wreath is complete, you can personalize it with extra crochet details.
- Crochet poinsettia: Add a red flower as the main focal point.
- Mini snowflakes: Attach small white snowflakes between the leaves.
- Extra berries: Make more berry clusters for a fuller wreath.
- Small bells: Attach lightweight bells securely.
- Decorative edging: Add a cream or gold border around the bow.
- Personalized detail: Add a small initial or name tag to the lower part of the wreath.
Common Crochet Christmas Wreath Mistakes
1. The Wreath Cover Is Too Short
Measure the strip around your foam ring before sewing the ends together. Add more rows if the foam is still visible.
2. The Cover Looks Loose
Check your tension and make sure the strip fits snugly around the foam. Avoid stretching it so much that the stitches become distorted.
3. The Spiral Detail Is Uneven
Plan the diagonal spacing before attaching the cream yarn. Keep the surface stitches consistent as you move around the ring.
4. The Leaves Curl
Try a slightly larger hook or relax your tension. Shape the leaves gently before attaching them.
5. The Berries Look Too Large
Use a smaller hook or fewer stitches if you want tiny berries. Keep the stuffing minimal so the berries remain neat.
6. The Bow Does Not Hold Its Shape
Wrap the center tightly and secure it with several stitches. Make sure both loops are similar in size.
7. The Decorations Keep Moving
Sew each piece securely through the crochet cover. Avoid relying on a single loose knot or a small dab of glue.
How to Care for Your Crochet Christmas Wreath
Keep your handmade wreath looking beautiful by storing it carefully after the holiday season.
- Remove dust with a soft brush or gentle air flow.
- Spot-clean only when suitable for the yarn and foam materials.
- Avoid soaking the foam wreath form.
- Allow any damp areas to dry completely.
- Store the wreath flat in a clean, dry box.
- Avoid placing heavy decorations on top of it.
Frequently Asked Questions
Is this crochet Christmas wreath pattern suitable for beginners?
It is suitable for confident beginners who know single crochet, chains, slip stitches, and basic shaping. The wreath cover is simple, while the decorative pieces require a little more practice.
What yarn is best for a crochet Christmas wreath?
Medium-weight acrylic or cotton yarn works well. Choose a yarn that creates a firm fabric and holds its shape around the wreath form.
What hook size should I use?
A 5.0 mm hook is a useful starting point for medium-weight yarn. Adjust the hook to create a cover that fits your foam ring snugly.
Can I make this wreath without a foam ring?
You can use a firm handmade ring or another suitable wreath form, but it should be sturdy enough to hold the crochet cover and decorations.
Can I make a larger crochet Christmas wreath?
Yes. Use a larger wreath form and make a longer crochet strip. Measure the strip around the form as you work to ensure a good fit.
How many berries should I add?
Five to seven small berries are a good starting point for an 8–9 inch wreath. Add more if you prefer a fuller design.
Can I add a crochet poinsettia to the wreath?
Yes. A red poinsettia makes a beautiful focal point. Attach it securely to the lower or upper side of the wreath, depending on your preferred arrangement.
Can I use this wreath as a front door decoration?
Yes, but keep it in a sheltered area away from rain, direct sunlight, and moisture. Yarn and foam decorations are best protected from harsh weather.
Can I sell finished crochet Christmas wreaths?
You can sell finished handmade items subject to any terms that apply to the pattern you follow. If you use another designer’s instructions, check their usage guidelines.
Conclusion
This crochet Christmas wreath pattern is a lovely way to bring handmade charm into your holiday home. The green ribbed cover, cream spiral, red berries, holly leaves, and decorative bow come together to create a festive decoration you can enjoy every Christmas.
Try traditional red and green, elegant burgundy and cream, or soft sage and ivory. You can also add a crochet poinsettia or snowflakes to make your wreath more personal.
Gather your yarn, prepare your wreath form, and enjoy creating a beautiful handmade decoration for the holiday season!