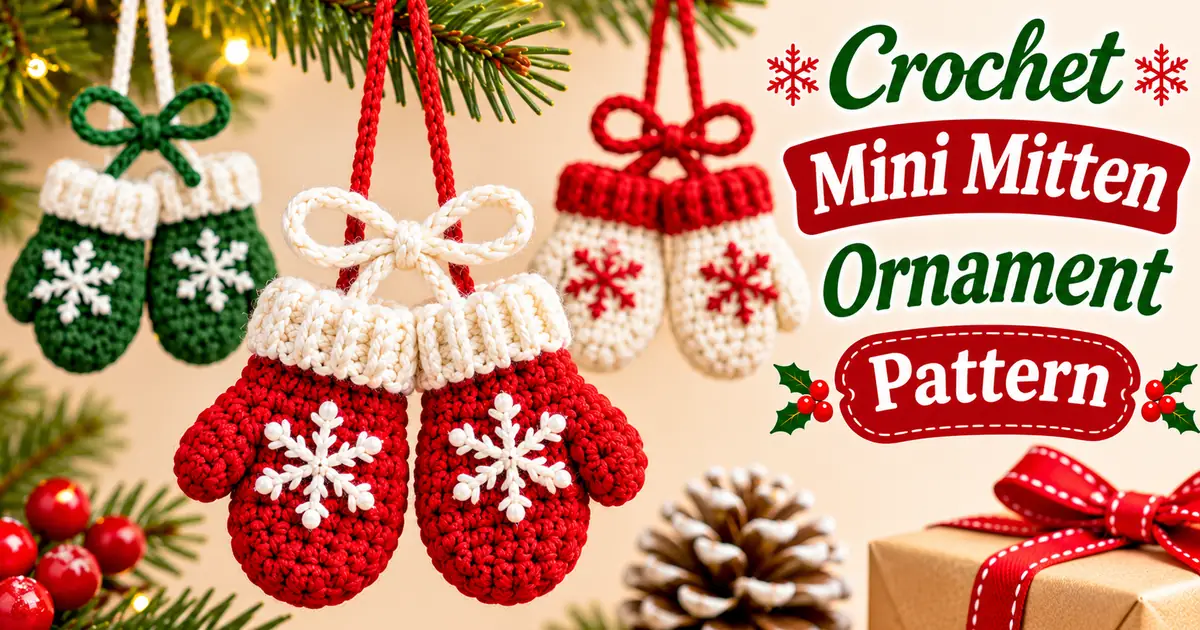
Add a cozy handmade touch to your holiday decorations with this Crochet Mini Mitten Ornament Pattern. These adorable little mittens feature a colorful crocheted body, a soft contrasting cuff, and pretty snowflake details. They look lovely hanging on a Christmas tree, decorating a festive garland, or adding a special touch to a wrapped gift.
The mini mittens are made with simple crochet stitches and small decorative details. You will crochet the cuff and mitten body, add a tiny thumb, and finish each mitten with an embroidered snowflake and a hanging loop. Classic red and white yarn gives them a traditional Christmas look, but you can choose any colors you love.
Whether you are making a matching pair for your own Christmas tree or creating thoughtful handmade gifts, this step-by-step tutorial will guide you through the process. Make one pair or several in different festive colors to create a sweet collection of mini crochet mitten ornaments.
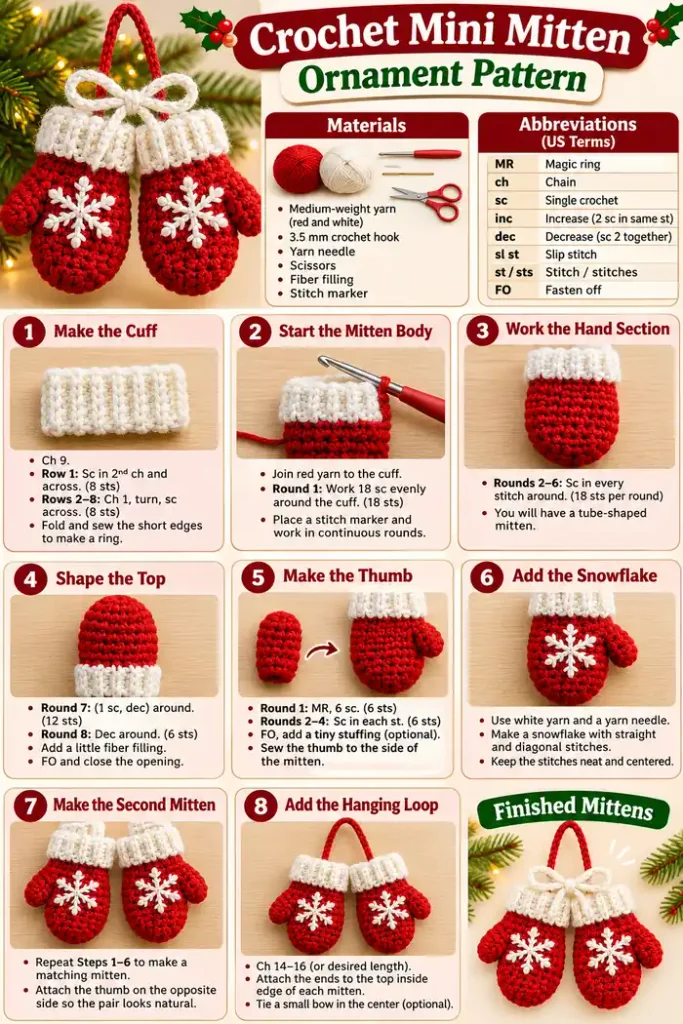
This Crochet Mini Mitten Ornament Pattern is a sweet little project for the Christmas season. The finished mittens have a cozy shape, a contrasting cuff, and a small snowflake detail that makes them look extra festive. Hang them on your Christmas tree, add them to a holiday garland, or use them as handmade gift decorations.
Each mitten is crocheted in small sections, making it a lovely project for using leftover yarn. You will make a cuff, crochet the mitten body, add a little thumb, and finish with simple embroidery and a hanging loop. Make a matching pair or mix your favorite Christmas colors.
- Skill level: Confident beginner
- Yarn: Medium-weight yarn
- Hook: 3.5 mm crochet hook
- Colors: Red and white, with optional green
- Finished size: Approximately 3–3.5 inches tall
- Construction: Separate cuff, mitten body, and thumb
- Decoration: Embroidered snowflake
- Terms: US crochet terminology
Materials You Will Need
Gather your supplies before starting. You only need small amounts of yarn, so this is a useful project for leftover Christmas colors.
- Medium-weight red yarn for the mitten body
- White or cream yarn for the cuff and snowflake
- Small amount of green yarn for optional decoration
- 3.5 mm crochet hook
- Small amount of fiber filling
- Yarn needle
- Scissors
- Stitch marker
Abbreviations Used in This Pattern
This tutorial uses standard US crochet terminology.
| Abbreviation | Meaning |
|---|---|
| MR | Magic ring |
| ch | Chain |
| sc | Single crochet |
| inc | Increase: 2 sc in the same stitch |
| dec | Decrease: crochet 2 stitches together |
| sl st | Slip stitch |
| st / sts | Stitch / stitches |
| FO | Fasten off |
Finished Size
Each mini mitten measures approximately 3–3.5 inches from the top to the bottom of the cuff. The final size depends on your yarn, hook, and crochet tension.
Important Notes Before You Start
- The cuff is worked flat in rows and then seamed into a ring.
- The mitten body is worked in continuous rounds from the cuff.
- Use a stitch marker to identify the first stitch of each round.
- The thumb is crocheted separately and sewn to the side of the mitten.
- Use only a small amount of stuffing to keep the mitten soft and lightweight.
- Make two mittens and position their thumbs in opposite directions for a matching pair.
How to Crochet Mini Mitten Ornaments
Follow the steps below to make the cuff, mitten body, thumb, and festive finishing details. Repeat the pattern to create a second mitten.
Step 1: Crochet the White Cuff
With white or cream yarn, make a chain to begin the ribbed cuff.
- Foundation: Ch 9.
- Row 1: Sc in the second chain from the hook and in each chain across. (8 sts)
- Rows 2–8: Ch 1, turn, and sc in each stitch across. (8 sts per row)
Fasten off, leaving a long sewing tail. Fold the strip so the short edges meet, then sew them together to create a small cuff ring.
Step 2: Start the Red Mitten Body
Join red yarn to the upper edge of the white cuff. Work 18 single crochet stitches evenly around the edge.
- Round 1: Work 18 sc evenly around the cuff. (18 sts)
- Place a stitch marker in the first stitch.
- Continue working in a spiral without joining the rounds.
Distribute the stitches evenly around the cuff so the red body does not bunch up or stretch the white band.
Step 3: Crochet the Main Mitten Shape
Work the next rounds in red yarn to create the hand section.
- Rounds 2–6: Sc in every stitch around. (18 sts per round)
The piece should now look like a small tube extending from the cuff. Keep your stitches even and check that the mitten is not twisting as you work.
Step 4: Shape and Close the Mitten Top
Now decrease the stitches to round off the top of the mitten.
- Round 7: Repeat (1 sc, dec) around. (12 sts)
- Round 8: Dec around. (6 sts)
Add a small amount of fiber filling before the opening becomes too small. Fasten off, leaving a long tail. Thread the tail through the remaining stitches and pull gently to close the top.
Weave in the end securely inside the mitten.
Step 5: Make the Thumb
Use red yarn to crochet a small thumb separately.
- Round 1: Make a magic ring and work 6 sc into it. (6 sts)
- Rounds 2–4: Sc in each stitch around. (6 sts per round)
Fasten off, leaving a long sewing tail. Add a tiny amount of stuffing if needed. Flatten the open base slightly and sew it to one side of the mitten, close to the upper half of the hand.
Repeat the same thumb instructions for the second mitten, placing it on the opposite side so the pair looks natural.
Step 6: Add the Snowflake Decoration
Use white yarn and a yarn needle to embroider a small snowflake on the front of each mitten.
- Bring the yarn out at the center of the mitten front.
- Make one short vertical straight stitch.
- Add one horizontal stitch across the center.
- Add two short diagonal stitches to create a snowflake shape.
- Add tiny stitches at the ends if you want a more detailed design.
Keep the embroidery stitches flat and secure. You can also use a small white star or simple stitched dots instead of a snowflake.
Step 7: Make the Second Mitten
Repeat Steps 1–6 to make the matching mitten. Use the same yarn, hook, and stitch counts so both pieces have a similar size.
Remember to attach the second thumb on the opposite side. Place the mittens next to each other before sewing the hanging loop to check their direction.
Step 8: Add the Hanging Loop
Use red, white, or matching yarn to make a loop that joins the two mittens.
- Ch 14–16, depending on your preferred loop length.
- Fasten off, leaving a long tail at both ends if needed.
- Position one end at the top inside edge of each mitten.
- Sew both ends securely to the mittens.
Check that the mittens hang evenly and that the loop is firmly attached before displaying the ornament.
Helpful Tips for Beautiful Mini Mittens
- Keep the cuff rows even so both mittens match.
- Count the 18 stitches around the cuff before starting the body.
- Use only a little stuffing so the ornament stays lightweight.
- Attach the thumbs at the same height on opposite sides.
- Keep the snowflake embroidery small and centered.
- Make the hanging loop strong enough to support both mittens.
Frequently Asked Questions
Can I make these mini mittens in different colors?
Yes. Red and white create a traditional Christmas look, but green, cream, burgundy, and gold are also lovely choices. You can make each pair in a different color combination.
Can I make the mittens larger?
Yes. Use thicker yarn and a larger hook, or add extra straight rounds to the mitten body. Make sure you adjust the cuff size as well so it fits the wider mitten.
Do I need to stuff the mini mittens?
Only a little stuffing is needed. A small amount helps the mitten hold a rounded shape, but too much can make the ornament bulky.
Can I skip the snowflake embroidery?
Absolutely. You can leave the mittens plain or decorate them with small hearts, stars, embroidered dots, or tiny holly details.
Can I use these mittens as gift decorations?
Yes. Attach the pair to a ribbon or gift tag, or tie them around a wrapped present for a sweet handmade Christmas touch.
How should I store my crochet mitten ornaments?
Keep them in a clean, dry box. Avoid placing heavy decorations on top so the cuffs and mitten shapes stay neat.
Final Thoughts
This Crochet Mini Mitten Ornament Pattern is a lovely way to add a cozy handmade detail to your Christmas decorations. With a soft cuff, tiny thumb, and delicate snowflake embroidery, these little mittens make a sweet addition to a Christmas tree or holiday gift.
Make a matching red and white pair, try forest green and cream, or create several colorful mittens for a festive garland. They are small, customizable, and a thoughtful way to use leftover yarn.
Enjoy making your mini mittens and adding a handmade touch to your holiday season!