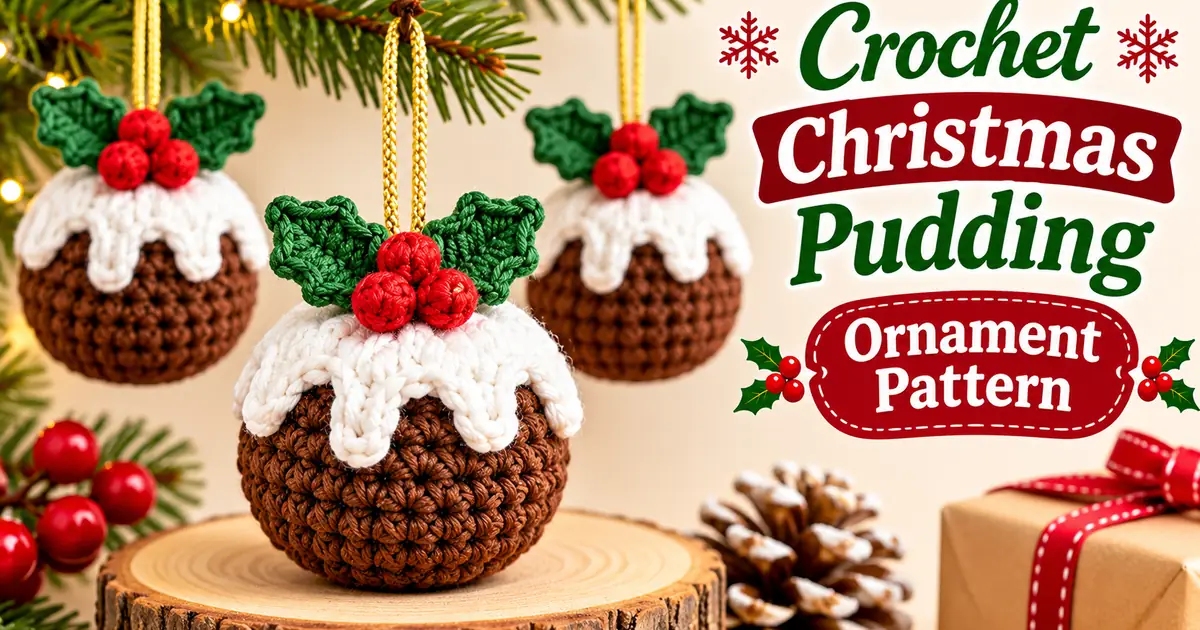
Add a sweet handmade touch to your holiday decorations with this Crochet Christmas Pudding Ornament Pattern. This adorable little pudding features a rich brown crocheted body, soft white icing, bright red berries, and green holly leaves. It looks lovely hanging on a Christmas tree or decorating a festive gift.
The pudding is worked in simple amigurumi rounds and decorated with separate icing and holly details. You can use classic Christmas colors and add a golden hanging loop to turn your finished crochet pudding into a charming seasonal ornament.
Whether you are making handmade decorations for your own home or creating thoughtful Christmas gifts, this step-by-step tutorial will guide you through crocheting the pudding, adding its festive details, and finishing it with a neat hanging loop.
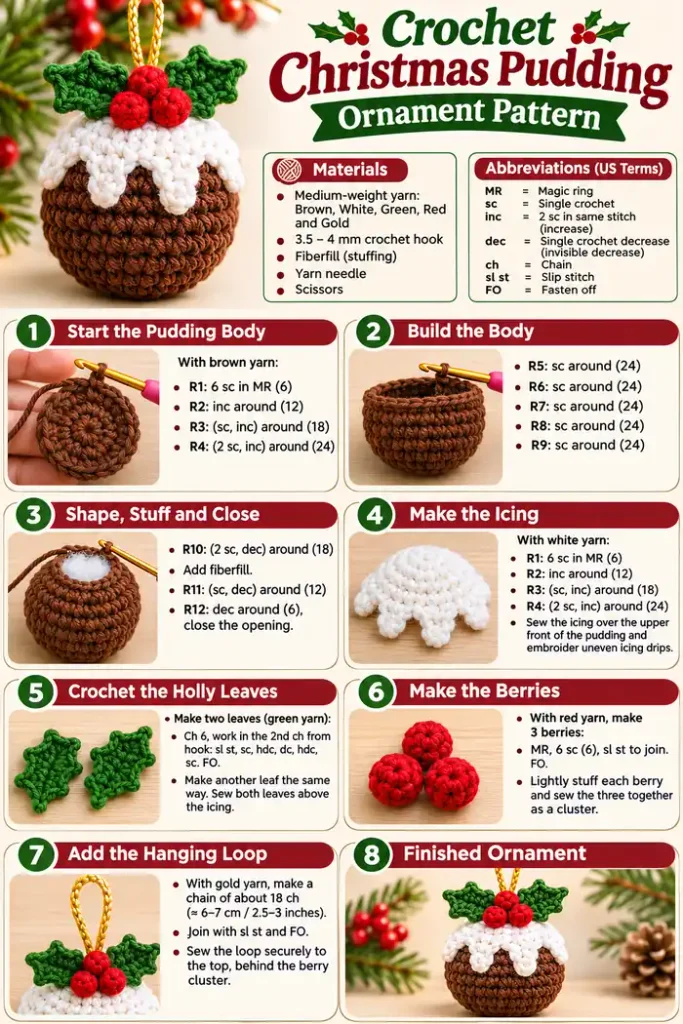
This Crochet Christmas Pudding Ornament Pattern is a fun little project for the holiday season. It creates a round, textured pudding with a rich brown body, white icing, red berries, and green holly leaves. A small hanging loop turns it into a cute decoration for your Christmas tree.
The pudding is worked in continuous amigurumi rounds, with increases shaping the body and decreases closing the bottom. The icing, leaves, berries, and hanging loop are added separately, giving you plenty of room to personalize your ornament.
- Skill level: Confident beginner
- Yarn: Medium-weight yarn
- Hook: 3.5 mm or 4 mm crochet hook
- Main color: Chocolate brown
- Other colors: White, green, red, and gold
- Finished size: Approximately 3.5 inches wide
- Construction: Amigurumi body with separate decorations
- Terms: US crochet terminology
Materials You Will Need
Gather your supplies before beginning. Small amounts of leftover yarn are enough for the icing, berries, leaves, and hanging loop.
- Medium-weight brown yarn for the pudding
- White or cream yarn for the icing
- Green yarn for the holly leaves
- Red yarn for the berries
- Gold or matching yarn for the hanging loop
- 3.5 mm or 4 mm crochet hook
- Fiber filling
- Yarn needle
- Scissors
- Stitch marker
Abbreviations Used in This Pattern
This tutorial uses standard US crochet terminology.
| Abbreviation | Meaning |
|---|---|
| MR | Magic ring |
| ch | Chain |
| sc | Single crochet |
| inc | Increase: 2 sc in the same stitch |
| dec | Decrease: crochet 2 stitches together |
| sl st | Slip stitch |
| st / sts | Stitch / stitches |
| FO | Fasten off |
Finished Size
The finished pudding measures approximately 3 to 3.5 inches wide and around 3 inches tall, excluding the hanging loop. The final size depends on your yarn, hook, and crochet tension.
Important Notes Before You Start
- The pudding body is worked in continuous rounds. Do not join at the end of each round.
- Use a stitch marker to identify the first stitch of every round.
- Move the stitch marker up as you finish each round.
- Keep your stitches firm so the stuffing does not show.
- Stuff the pudding gradually before the opening becomes too small.
- The icing, leaves, berries, and hanging loop are made separately.
How to Crochet a Christmas Pudding Ornament
Follow the steps below to crochet the rounded pudding body and add its festive decorations.
Step 1: Start the Pudding Body
Using chocolate-brown yarn, make a magic ring. This forms the bottom center of the pudding.
- Round 1: Work 6 sc into the MR. (6 sts)
- Round 2: Inc in every stitch around. (12 sts)
- Round 3: Repeat (1 sc, inc) around. (18 sts)
- Round 4: Repeat (2 sc, inc) around. (24 sts)
You now have a small flat circle. This is the base of your pudding.
Step 2: Build the Rounded Pudding Shape
Continue working in brown yarn without increasing to build the rounded sides.
- Rounds 5–9: Sc in every stitch around. (24 sts per round)
The piece should begin to curve into a little rounded pudding shape. Keep your tension even and check that the stitches are not too loose.
Step 3: Shape and Close the Pudding
Start decreasing to narrow the bottom opening. Add the stuffing before the opening becomes too small.
- Round 10: Repeat (2 sc, dec) around. (18 sts)
- Stuff: Add small amounts of fiber filling and shape the pudding gently.
- Round 11: Repeat (1 sc, dec) around. (12 sts)
- Round 12: Dec around. (6 sts)
Fasten off, leaving a tail. Use your yarn needle to close the remaining opening and weave in the end securely.
Step 4: Crochet the White Icing Top
Use white or cream yarn to make a small icing piece that sits over the top of the pudding.
- Round 1: Make a MR and work 6 sc into it. (6 sts)
- Round 2: Inc in every stitch around. (12 sts)
- Round 3: Repeat (1 sc, inc) around. (18 sts)
- Round 4: Repeat (2 sc, inc) around. (24 sts)
Fasten off, leaving a long sewing tail. Place the icing circle over the upper part of the pudding and sew it in place, allowing some of the white edge to drape over the brown body.
To create icing drips, use white yarn to embroider several short chain-like lines from the edge of the icing down onto the brown pudding. Make the drips different lengths for a natural look.
Step 5: Make the Holly Leaves
Use green yarn to crochet two small leaves for the top of the pudding.
- Ch 6.
- Sl st in the second ch from the hook.
- Sc in the next ch.
- Hdc in the next ch.
- Dc in the next ch.
- Work (dc, ch 2, sl st) into the last chain to create the leaf tip.
Continue along the opposite side of the starting chain with dc, hdc, sc, and sl st to shape the other edge. Fasten off, leaving a sewing tail.
Make a second leaf in the same way. Position both leaves at the top of the white icing and sew them securely.
Step 6: Make the Red Berries
Make three small red berries to complete the Christmas holly decoration.
- Make a magic ring with red yarn.
- Work 6 sc into the ring. (6 sts)
- Work 1 sc in each stitch around for one round. (6 sts)
- Add a tiny amount of fiber filling.
- Fasten off and close the opening with a yarn needle.
Repeat to make three berries. Sew them together in a small cluster and attach them between the two green leaves.
Step 7: Make the Hanging Loop
Use gold or matching yarn to make a loop for hanging your pudding ornament.
- Ch 18, or adjust the length to your preference.
- Join the ends with a slip stitch to create a loop.
- Fasten off, leaving a long tail.
- Sew both ends securely to the top center of the pudding, behind the holly decoration.
Check that the loop is firmly attached before hanging your ornament.
Step 8: Finish and Shape Your Ornament
Your crochet Christmas pudding is almost ready. Check the finishing details carefully.
- Weave in all loose yarn ends.
- Shape the pudding gently with your fingers.
- Check that the icing is securely sewn.
- Make sure the holly leaves and berry cluster are firmly attached.
- Check the hanging loop and reinforce it if necessary.
Your handmade Christmas pudding ornament is now ready to display.
Helpful Tips for a Beautiful Christmas Pudding
- Use firm, even stitches to keep the stuffing hidden.
- Add stuffing in small amounts to maintain a rounded shape.
- Use cream yarn for a softer icing effect or bright white for a snowy look.
- Make the icing drips different lengths for a natural appearance.
- Arrange the holly leaves and berries before sewing them permanently.
- Use a strong hanging loop so the ornament stays secure on the tree.
Frequently Asked Questions
Can I make this Christmas pudding ornament larger?
Yes. You can use thicker yarn and a larger hook. You can also add another increase round to the body, followed by a matching straight round and adjusted decrease rounds. Make sure the icing piece is enlarged to fit.
Can I use leftover yarn for this pattern?
Absolutely. This small project is perfect for using leftover brown, white, green, and red yarn from other crochet projects.
Can I make the pudding without stuffing?
You can make a flat version by crocheting two matching pudding panels and sewing them together around the edge. Add the icing and holly details before joining the panels.
How do I make the icing look more realistic?
Use white yarn to embroider several uneven drips around the edge of the icing. Vary their lengths to create the look of icing flowing over the pudding.
Can I use this crochet pudding as a gift topper?
Yes. You can attach a short loop to the top or sew it onto a ribbon. It makes a lovely handmade decoration for a wrapped Christmas present.
How should I store my crochet pudding ornament?
Store it in a clean, dry box away from moisture and heavy objects. Keep the holly leaves and berries from being crushed during storage.
Final Thoughts
This Crochet Christmas Pudding Ornament Pattern is a sweet way to add handmade charm to your holiday decorations. The chocolate-brown body, white icing, red berries, and green holly create a classic festive look that feels right at home on a Christmas tree.
Make several little puddings for your tree, use them as handmade gift toppers, or create a set of matching ornaments for family and friends. You can even experiment with different icing shades and berry arrangements to make every pudding unique.
Enjoy your Christmas crochet and have fun making these adorable handmade decorations!