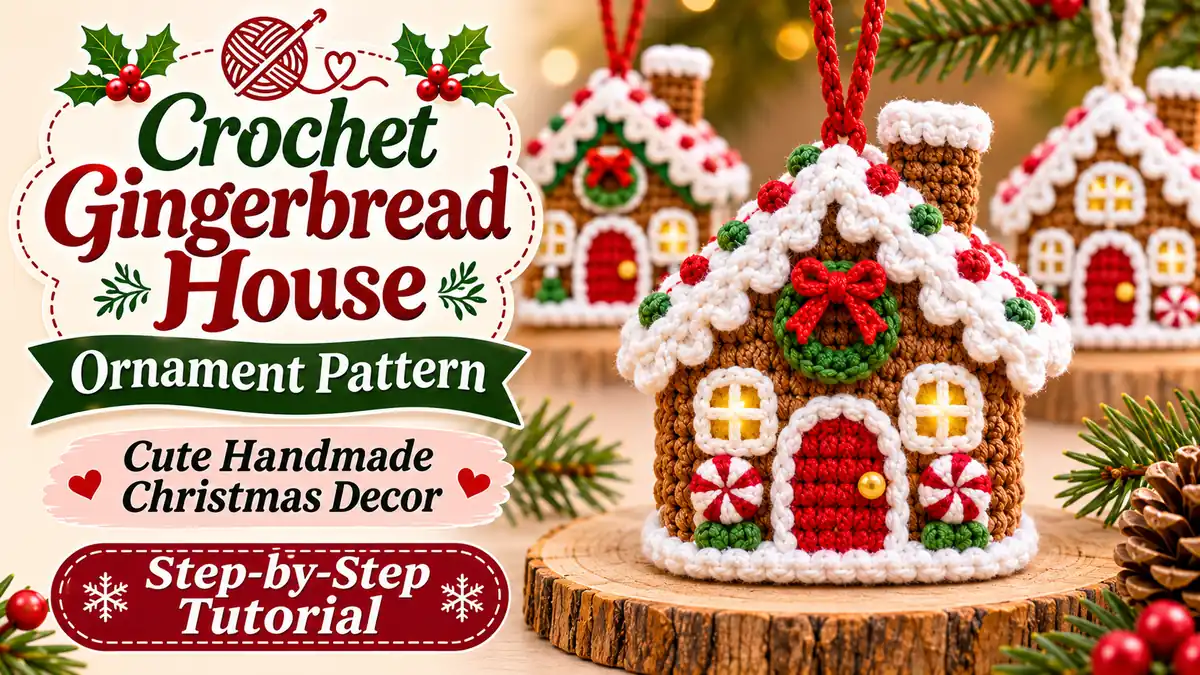
Christmas is the perfect time to make something sweet and handmade for your holiday decorations. This Crochet Gingerbread House Ornament Pattern brings the charm of a little gingerbread cottage to your Christmas tree, with a cozy brown house, snowy white icing, colorful candy details, and a cute hanging loop.
The little house is made with simple crochet pieces that are joined together and decorated with a roof, door, windows, and festive details. You can choose classic gingerbread brown with white icing or add red, green, and other cheerful colors to make your own design.
Whether you are decorating your tree, making handmade gifts, or adding a special touch to your holiday craft collection, this step-by-step tutorial will guide you through creating your own adorable crochet gingerbread house.
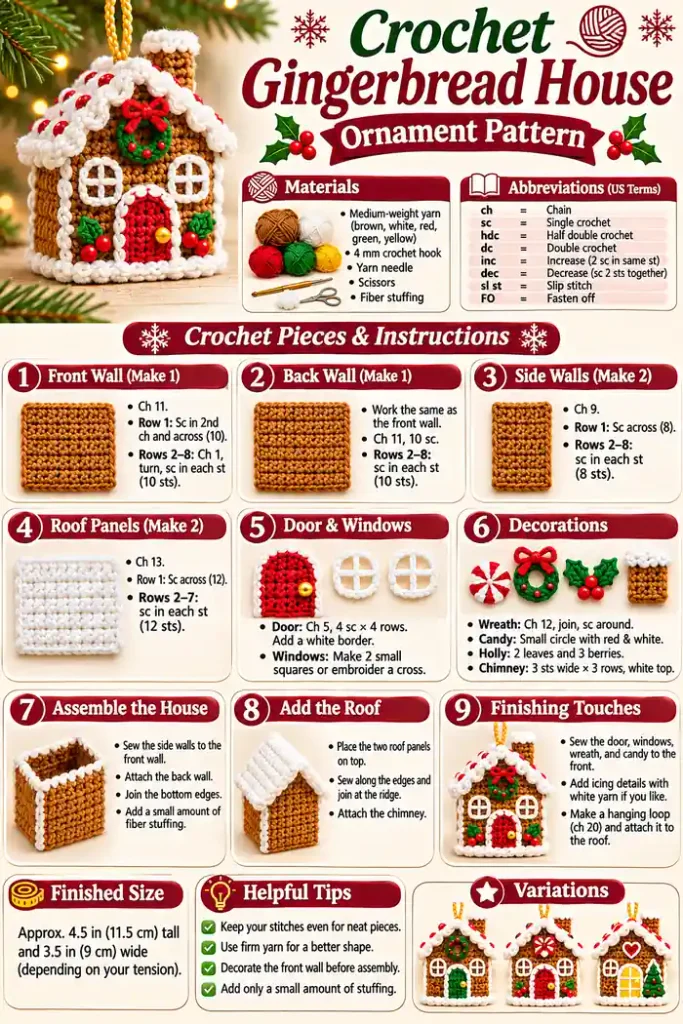
This Crochet Gingerbread House Ornament Pattern is a charming little project for the Christmas season. It creates a decorative miniature house with a warm gingerbread-brown body, a snowy roof, a front door, windows, and colorful candy-inspired details.
The house is crocheted in separate pieces and then sewn together. This construction lets you decorate the front before assembly and choose your favorite icing, candy, and holiday colors. Add a hanging loop to turn your finished house into a sweet Christmas tree ornament.
- Skill level: Confident beginner
- Yarn: Medium-weight yarn
- Hook: 4 mm crochet hook
- Main color: Gingerbread brown
- Other colors: White, red, green, and yellow
- Finished size: Approximately 4.5 inches tall and 3.5 inches wide, depending on tension
- Construction: Separate flat pieces, sewn together and lightly stuffed
- Terms: US crochet terminology
Materials You Will Need
Gather the following supplies before starting your gingerbread house ornament.
- Medium-weight yarn in gingerbread brown
- Small amounts of white, red, green, and yellow yarn
- 4 mm crochet hook
- Yarn needle
- Scissors
- A small amount of fiber filling
- Stitch marker (optional)
- Small beads or buttons for optional candy decorations
Abbreviations Used in This Pattern
This pattern uses US crochet terms. Review these abbreviations before beginning.
| Abbreviation | Meaning |
|---|---|
| ch | Chain |
| sc | Single crochet |
| hdc | Half double crochet |
| dc | Double crochet |
| sl st | Slip stitch |
| inc | Increase: 2 sc in the same stitch |
| dec | Single crochet decrease over 2 stitches |
| st / sts | Stitch / stitches |
| FO | Fasten off |
Important Notes Before You Start
- The house is made from flat crocheted panels.
- Turn your work at the end of each row.
- Ch 1 at the beginning of a row does not count as a stitch.
- Make two matching roof panels and two matching side panels.
- Decorate the front wall before sewing the house together.
- Use a yarn needle to sew the pieces together neatly.
How to Crochet a Gingerbread House Ornament
Follow the steps below to make the house panels, roof, decorations, and hanging loop.
Step 1: Crochet the Front Wall
With gingerbread-brown yarn, make the front wall of the house.
- Foundation: Ch 11.
- Row 1: Sc in the second ch from the hook and in each ch across. (10 sts)
- Rows 2–8: Ch 1, turn, sc in each stitch across. (10 sts per row)
Fasten off, leaving a long tail for sewing. This is the front wall of your gingerbread house.
Step 2: Crochet the Back Wall
Make a second brown panel using exactly the same instructions as the front wall.
- Ch 11.
- Row 1: 10 sc across.
- Rows 2–8: Ch 1, turn, 10 sc across.
Fasten off and keep the panel for assembly.
Step 3: Make the Side Walls
With brown yarn, crochet two smaller rectangular side panels.
- Foundation: Ch 9.
- Row 1: Sc in the second ch from the hook and across. (8 sts)
- Rows 2–8: Ch 1, turn, sc in each stitch across. (8 sts per row)
Fasten off after the eighth row. Repeat to make the second side wall.
Step 4: Crochet the Roof Panels
Use white yarn to make two rectangular roof panels that represent snowy icing. You can also make them in brown and add white edging afterward.
- Foundation: Ch 13.
- Row 1: Sc in the second ch from the hook and across. (12 sts)
- Rows 2–7: Ch 1, turn, sc in each stitch across. (12 sts per row)
Fasten off and make a second matching panel.
Step 5: Make the Door and Windows
Use red yarn for the door and white yarn for the window frames.
Door:
- Ch 5 with red yarn.
- Row 1: Sc in the second ch from the hook and across. (4 sts)
- Rows 2–4: Ch 1, turn, 4 sc across.
- Fasten off and use white yarn to add a simple border.
Windows:
- Make two small white window frames using surface embroidery or small crocheted squares.
- Use white yarn to stitch a cross in the center of each window.
- Leave the window pieces ready to sew onto the front wall.
Step 6: Add the Chimney and Candy Decorations
Use small amounts of contrasting yarn to create the festive details.
- Chimney: Crochet a small brown rectangle using 3 stitches across and 3 rows. Add a white top.
- Candy: Make small red and white circles or embroider candy-cane stripes.
- Holly: Stitch two small green leaves and add red berry details.
- Icing: Use white yarn to embroider decorative lines around the roof and door.
Keep the decorations small so they fit the miniature house.
Step 7: Assemble the Gingerbread House
Lay the front wall flat and arrange the door, windows, and decorations. Sew them securely in place before joining the walls.
- Place the front and back wall panels opposite each other.
- Sew one side wall to each side edge of the front panel.
- Attach the back wall to the remaining side edges.
- Join the bottom edges neatly.
- Lightly add fiber filling if you want a padded ornament.
- Position the two roof panels over the top and sew them in place, joining their upper edges to form a roof ridge.
- Attach the chimney and remaining decorations.
Keep the seams firm and neat. Avoid adding too much stuffing, as it may distort the small house shape.
Step 8: Add the Hanging Loop
Use gold, cream, or matching yarn to make a loop for hanging the ornament.
- Ch 20, or adjust the length to your preference.
- Join the chain ends with a slip stitch to form a loop.
- Fasten off, leaving a long tail.
- Sew the loop securely to the top of the roof.
Check that the loop is firmly attached before hanging your ornament.
Finishing Your Crochet Gingerbread House
Check all the seams and decorations before displaying your ornament.
- Weave in all loose yarn ends.
- Check that the roof panels are securely attached.
- Make sure the door, windows, and candy details are firmly sewn.
- Shape the house gently with your hands.
- Check that the hanging loop is secure.
Helpful Tips for a Beautiful Gingerbread House
- Use a consistent tension so the panels have neat edges.
- Choose a warm brown yarn to create the gingerbread look.
- Use white yarn for snowy icing and roof details.
- Plan the front decoration before sewing the walls together.
- Use small, lightweight decorations so the ornament hangs properly.
- Make the hanging loop strong enough to support the finished ornament.
Frequently Asked Questions
Can I make this gingerbread house ornament in different colors?
Yes. You can use cream, tan, or darker brown yarn for the house and choose any contrasting colors for the icing, door, windows, and candy decorations.
Can I make the ornament without stuffing?
Yes. You can leave the house flat for a lightweight decoration. If you prefer a padded ornament, add a small amount of fiber filling before closing the final seams.
Can I use this gingerbread house as a gift tag?
Yes. Make a smaller version and attach a short loop or ribbon. It can be used as a handmade gift topper or a decorative gift tag.
How can I make the roof look like snowy icing?
Use white yarn for the roof panels or crochet a white edging around brown roof pieces. You can also add small scallops to create a frosted appearance.
How should I store my crochet gingerbread house?
Store it in a clean, dry container away from moisture and heavy objects. Place it carefully so the roof and decorations do not become flattened.
Final Thoughts
This Crochet Gingerbread House Ornament Pattern is a sweet handmade addition to your Christmas decorations. With its cozy brown walls, snowy roof, colorful candy details, and hanging loop, it brings a little gingerbread-house charm to your holiday season.
Make one for your own Christmas tree or create several in different colors for handmade gifts. You can change the decorations, add tiny wreaths, or create a whole collection of miniature gingerbread houses.
Enjoy making your festive crochet ornament and have a wonderful Christmas crafting season!